Monday, December 28, 2009
Earl Grey Apple Sauce with Roasted Vanilla Walnuts
I didn't intend for them to go together, but once I had them both made, combining them sounded good. And I was right. They're great together!
First, I found the applesauce recipe at FoodMayhem a few months ago, but haven't had the chance to make it. It's quick, simple and satisfying. I didn't find the Earl Grey overpowering, either. I'm a big fan of Earl Grey tea, so I would've been OK with it if it did add a strong flavor, but it turned out subtle and tasty.
4 Apples, peeled and chopped into slices
1 cup of water
1/4 cup light brown sugar
1/4 teaspoon kosher salt
1 bag of Earl Grey tea with the tag and string removed.
1. Combine apples, water, sugar and salt in a pot & bring to a boil
2. Submerge the tea bag in the water, stir so that the apples cover it
3. Reduce to a simmer & place lid on pot for about 15 mins or until most of the water has simmered off.
4. Discard tea bag.
At this point, you can mash if you'd like, but I didn't. I left the apple slices whole.
Roasted Vanilla Walnuts
I found this recipe at Elana's Pantry & it's wonderful.
Since we have 2 cars in the shop & the one functioning vehicle we have is tempremental and cranky, we weren't able to give the kind of gifts we really wanted to give this year. we're broke. so I made muffins and cookies for our families. After our daughter opened all of her presents, I was browsing on foodgawker & came across this and it was perfect! I, amazingly, had all of the ingredients in my pantry & whipped these up in 5 mins flat! I added some to each gift bag along with the baked goods & a jar of home made tomato soup.
Ingredients:
2 cups raw walnuts
1 Tablespoon Olive Oil
2 Tablespoons Agave Nectar (honey could probably be substituted for non-vegans)
1/4 teaspoon sea salt
1 -2 vanilla pods, split and scraped, or about 1/2 a teaspoon of the beans
dash of cinnamon
1. pour the olive oil in a skillet & turn on high.
2. add the walnuts & stir so that they are coated
3. when they start to sizzle, turn down the temp to med/low
4. add agave nectar & stir until nuts are coated.
5. let the nuts sizzle slightly for a couple of minutes, then stir in the salt
6. add the vanilla beans and stir until walnuts are coated
7. add dash of cinnamon & stir
transfer to a plate & allow to cool.
I'm so in love with this recipe and I keep thinking of all the ways I could eat these. Mostly, I've just been eating them by the handful, but they're great added to the apple sauce. I'm pretty sure they'd go well with sweet potatoes and oatmeal too.
Sunday, December 20, 2009
Holiday Preparation
Obviously, we went the jiggle and pray route since it's the week of the holiday and our shopping isn't done.
This means I will be making cookies to give to our friends and families for the holiday.
Thankfully, a number of cookie recipes that I've posted recently are of the "do-ahead-and-store-in-the-fridge" variety.
Currently, I have 3 batches of chocolate cookie dough in my freezer (although one of those batches may not work. I tried to use a diabetic friendly sugar substitute and it didn't work as well as I thought it would)
And today, I've got to make 3 batches of sugar and at least 2 batches of chocolate chip.
That way all that my husband & I have to do is roll them, bake them & bag them.
In between all of this, I also have to make the chocolate chip muffins my husband is in love with.
I just hope I have enough ingredients for all of this because it's snowing here. REALLY snowing here. From the reports I've heard, most of the east coast is blanketed with a ton of snow right now.
So if you're getting snowed on, stay warm & take care and have a happy holiday!
Sunday, December 13, 2009
Cocoa Crinkle Cookies
I found this at "Behind The Skillet" and they are divine!
We hosted a dinner party last night & I made these for our guests and ohmygod they went fast!
They're simple, elegant, moist and petty.
who could ask for more?
Ingreidents:
3/4 cup flour
1/2 cup good quality unsweetened cocoa powder
1 teaspoon baking soda
1/4 teaspoon salt
1/2 cup (1stick)
1 1/4 cup sugar, plus another 1/2 cup sugar
2 eggs
2 tsp vanilla
Step 1: In a large bowl, sift together the flour, cocoa, baking soda and sal. While you're doing this, Melt the butter in a saucepan. Once the butter is totally melted, set it aside and allow it to cool for a few minutes.
Step 2: In a separate bowl, mix the 1 1/4 cup of sugar, eggs and butter. Whisk well until it has a smooth, creamy cconsistency and then add the vanilla. Whisk until well blended.
Step 3: Stir the butter mixture into the dry ingredients and stir well until combined.
Step 4: Wrap and chill in your refridgerator for at least 2 hours or overnight
Step 5: Preheat oven to 350, and line cookie sheets with parchment paper. Shape dough into small balls and roll ina bowl with 1/2 a cup of white sugar. Place balls on the parchment paper and flatten slightly with a spoon.
bake for 12 minutes.
Chocolate Chip Muffins
The Picky Hubby wanted something different for breakfast.
but he wasn't sure what kind of different.
he was just sure that he was tired of corn muffins and banana muffins.
So, I came up with this little recipe and it was a big hit.
He likes the texture & density of the muffins, they fill him up
and most importantly
they go well with his morning coffee.
The Little One loves these as well, so I usually end up making 2 batches of this so there's enough for everybody.
Ingredients:
2 cups all purpose flour
1/3 cup white sugar
1/3 cup brown sugar
2 teaspoons baking powder
1/2 teaspoon of salt
2/3 cup milk
1 stick of butter melted and cooled (1/2 cup)
2 eggs lightly beaten
1 teaspoon vanilla extract
1 cup of chocolate chips (more or less to taste)
Preheat oven to 400 and line muffin tin with muffin cups. In a large bowl mix together flour, white sugar, brown sugar, baking powder and salt.
In another bowl stir together eggs, milk, melted butter and vanilla until well blended. Make a small well in the middle of the dry ingredients and pour in the wet mixture. Stir until well combined and then add the chocolate chips
Spoon mixture into the muffin cups. Bake for 15-20 mins until ligthly brown on top. Allow to cool before eating or storing.
the original recipe calls for an entire 11 oz package of chocolate chips to be added, but personally, that's a bit much for breakfast. And my husband really loves the dough the best in this muffin. the chips are just secondary.
Sunday, September 20, 2009
Cookies For Breakfast!
I found this recipe at Hippie With a Minivan and decided that I must try it.
I made it two different ways. One way for me and one way for my daughter.
For my daughter I stuck to the exact recipe and she loved it!
This is it:
In a medium sized bowl, mix the following:
- 1 1/3 cup Oatmeal
- 1/4 cup golden raisins
- 1/4 cup chocolate chips
- 1/4 cup flour
- 1 cup non-fat powdered milk
- 1/4 cup sugar
- 1 tsp baking powder
- pinch of salt
- 1 tsp cinnamon
- 1/4 cup pecans
once that's mixed, add in
- 1 cup Apple Sauce
- 1 tsp vanilla
bake at 350 degree oven for about 15 min.
I got 6 good sized cookies out of this recipe & they were fantastic!
Now, what I did for my version of this was the following:
In a medium sized bowl, mix the following:
- 1 1/3 cup Oatmeal
- 1/4 cup dried pineapple
- 1/4 cup white chocolate chips
- 1/4 cup flour
- 1 cup non-fat powdered milk
- 1/4 cup sugar
- 1 tsp baking powder
- pinch of salt
- 1 tsp cinnamon
- 1/4 cup macadamia nuts
- pinch of vanilla bean
once that's mixed, add in
- 1 cup Apple Sauce
- 1 tsp vanilla
These were a big hit & me and my daughter
* * * note: i've been playing around with this & have used different sauces besides apple sauce. i most recently used a sweet potato sauce i made and added cranberries, pecans and used orange extract instead of vanilla & it was even better!
This recipe lends itself to creativity & i try to mix it up every so often.
Monday, September 7, 2009
Peaches
pie
cake
torte?
lets just stick with 'thing'
thing works.
so this is a Peach Thing
that is delish!
i found the recipe here at Whitneyinchicago and modified it a bit.
i've seen this exact recipe on a couple of different sites, and it's one that works for me since it's low on the dairy and high on the simplicity.
Technically it's called Peach Tea Cake.
and it's dang good.
Here's what you'll need:
- 2 1/4 cups all-purpose flour
- 1 teaspoon baking powder
- 1 teaspoon salt
- 1 cup sugar
- 1 1/2 sticks of butter
- 3 eggs
- 1 tablespoon vanilla extract
- 4 sliced peaches
- 1/2 teaspoon of cinnamon
- 1/4 teaspoon of ginger
- 1/4 teaspoon vanilla bean
- 1/2 teaspoon of brown sugar
- 1/2 cup chopped pecans
1. Mix the flour, baking powder, and salt together in a bowl and set aside.
2. Cream the sugar & butter until light and fluffy
3. Add the eggs one at a time, then the vanilla extract
4. While mixing, slowly add the flour mixture and stir just until smooth dough forms.
5. Preheat the oven to 375F and pat a portion of the dough into the bottom of pie or casserolle dish. i sprayed it with butter flavored non-stick spray, but you could use pats of butter instead. The bottom layer of the dough should be about an inch thick & it should go up the side of the dish just a bit.
6. Pour the peaches on top of the dough in the dish & spread it evenly.
7. Use he remainder of the dough in spoonfull size portions & cover the peaches
8. Bake for 30 to 40 minutes, or until lightly golden and firm. Cool for 30 minutes before serving.
This came out really well & my daughter loved it so it's definitely a keeper!
Sunday, July 12, 2009
Rosemary Infused Lemon Spritzer
I love Rosemary.
I also love anything citrus.
So, when I found this recipe for Rosemary Infused Lemon Vodka Spritzers on Brownies For Dinner, I just couldn't resist.
And besides, it's so easy!
However, I wasn't sure how I would like it because I'm not a big fan of plain Vodka & I've never had Rosemary as a drink before.
But let me tell you, this little recipe here is the bomb-diggedy!
The Rosemary is more for scent than actual taste. That is, it tastes mostly like lemons, but it smells like Rosemary.
And with a little ice? Absolute perfection.
here's how to make the rosemary lemon syrup from "Brownies For Dinner"
"Rosemary lemonade simple syrup
(adapted from Gourmet via The Bitten Word)
1 cup lemon juice
1 cup sugar
4 four-inch sprigs of rosemary
1. Place lemon juice, rosemary, and sugar in a medium pot.
2. Bring to a boil, stir to dissolve sugar.
3. Allow to simmer for about 2 minutes, then remove from heat.
4. Let it cool completely (about 1 hour), then remove the rosemary.
5. Use the syrup and enjoy!"
I did a shot of the syrup, a shot of vodka, 2 ice cubes & filled with spritzer.
Perfection!
Sunday, June 28, 2009
Coconut Steamed Rice with Fruit
In fact, I see this becoming a new summer staple.
I inherited a Panasonic Rice Steamer a few years back, when a friend of my husbands upgraded his. It's the best thing in the whole world & I don't know how to make rice any other way now. So all of my rice is steamed to absolute fool proof perfection every time.
So please pardon my directions here as they are kind of sketchy & not exactly precise.
- cover rice with an equal mix of water and Calahua Coconut Cream and steam.
- when it's done, set it out to cool down to room temperature
- top with slices of fresh pineapple and raspberries.
and enjoy.
it's seriously ohmygodgood. sweet but really good!
once it cooled completely I covered with the raspberries & stored in the fridge, but when I want to have it, I'll slice the pineapple at that time.
Potato Salad
He doesn't normally eat potato salad, but there are enough of the things he does like in this, that I thought I'd take a chance.
And happily, he loves it!
Ingredients:
- Yukon Gold Potatoes
- 1 small Red Onion, chopped
- 3 ribs Celery, chopped
- 3 Tbsp chopped fresh Chives
- 6 Tbsp Sour Cream
- 1 Lemon, juiced
- 5 Tbsp Prepared Horseradish
- 2 Tbsp Olive Oil
- Sea Salt to taste
- Freshly Ground Black Pepper to taste
Method
"Boil the potatoes until just tender. Drain and cut the potatoes into quarters or halved if smaller.
In a separate dish, combine red onion, celery, chives, sour cream, lemon juice, and horseradish and mix well. Add olive oil and season with salt and pepper to taste.
Combine the potatoes with the dressing and mix thoroughly. Cover and refrigerate for about 1 to 2 hours before serving."
or devour immediately like we did. either way, really, but I'm sure it will be even better in tomorrows lunch.
Saturday, June 27, 2009
Orzo and Vegetable Confetti Salad
I found it years ago in a Williams Sonoma cookbook and fell in love.
Unfortunately, the cookbook belonged to my then-step-mother. And when her & my dad divorced, I didn't get the opportunity to copy down the recipe. So for years, I didn't have it. And then after much digging, I found it online at the Williams Sonoma website. And let me tell you, I was VERY happy! You can find the actual recipe here, but I don't really change much about it.
Ingredients:
- 1 box orzo
- olive oil
- 1 tsp. grated lemon zest
- 1/3 cup fresh lemon juice
- Salt and freshly ground pepper, to taste
- 12 radishes, diced*
- 3 carrots, peeled and diced*
- 8 green onions, green and white portions, thinly sliced*
- 2 Tbs of capers, drained
- 1 lemon, cut into 6 slices
Directions:
In a large pot over high heat, bring the water to a boil. Add the 2 Tbs. salt and the orzo and cook until tender, 5 to 8 minutes. Drain the orzo and immediately toss it with 1 Tbs. of the olive oil. Cover and cool completely. You can put it in the fridge for this, but I usually don't. I toss it with the olive oil & just let it sit out on the counter to cool, stirring occasionally while chopping the veggies. By the time the veggies are chopped, the pasta will be cool enough to add them to the mix.
In a large bowl, whisk together 4 Tbs. olive oil, the lemon zest, lemon juice, salt and pepper. Add the radishes, carrots, green onions, capers and orzo. Toss to mix well.
It's pretty easy and straight forward, and best of all, it has a very fresh and light flavor.
*note: the quantity of carrots, onions & radishes may vary according to taste & size of said vegetable. I get my veggies from a local farm where they grow outrageously huge, so I only had to use a carrot & a half & 6 radishes & 6 onions. The whole thing is pretty much to taste anyway. It's a pretty flexible recipe.
Thursday, June 25, 2009
Pesto Penne
This, my friends, is my new favorite summer dish.
EVER.
This is the most awesomest & most brilliant and delicious thing I've eaten in quite a while.
And the best part about it, is that it's super quick and easy!
Recipe:
- 1 box of penne pasta - boiled
- 1 package of pesto sauce - prepared
- 1 box of cherry tomatoes
- fresh mozzeralla
- kosher salt
boil the pasta until it's al dente, splash with a little bit of olive oil & set aside to cool
prepare the pesto & set it aside to cool a little bit, then pour over the pasta & toss well.
while that's cooling, chop the fresh mozzerella into bite sized pieces. put it in the pasta & pesto & toss well again. this time, add some kosher salt
half the cherry tomatoes, add to the mix & toss well again.
and that is it!
it's so good i almost cried. seriously.
i will give you this piece of advice on this:
be sure that the pasta & pesto have cooled well before adding the cheese, or it will melt. not that that's a big deal, but this is a cool to room temp served dish & the cheese really shouldn't be all melty for this.
i see myself eating this all summer.
Saturday, June 20, 2009
Chocolate Covered Pretzels
i had a massive craving for chocolate. and decided to make the peanut butter cups.
the problem, however, was that my need for chocolate was immediate.
the chocolate was melting
my husband was eating mini pretzels.
you do the math.
i left them to cool on waxed paper & then kept in the fridge over night.
they were mighty good.
mighty good.
and i'll bet they'd be even better with some popcorn.
Tuesday, May 19, 2009
Chocolate Covered Strawberries
On Mothers Day I attempted to make White Chocolate dipped strawberries & failed miserably. I'd never worked with white chocolate before & quickly discovered that it doesn't behave the same way that regular chocolate does.
When I make the peanutbutter cups, I melt the chocolate & then take it to the dining room table where I fill the cups. This cannot be done with white chocolate apparently. The minute I took it off of the burner, it solidified & would not melt again. I tried to microwave it & it still wouldn't melt again. It just burned & filled the house with a disgusting smell.
So in order to salvage the project, I just dipped them into regular chocolate & then melted a new batch of white chocolate & drizzled it over the berries. And that worked out just fine.
However, I was undaunted & wanted to try the white chocolate dipped experiment again. So this weekend, I did it.
Here's what I learned:
Melt the white chocolate in a double boiler.
While the white chocolate is still on the stove, dip the strawberries in & give them a good twist or two to make sure they're totally coated.
Once they're coated, place on wax paper & put them in the fridge.
Once they've cooled & completely solidified, drizzle melted chocolate over the top.
Like the peanutbutter cups, they're pretty easy & make a good impression. And my mom loved them!
Sunday, May 17, 2009
Seth's Banana Cake Muffins
She made it by hand on a word processor and taped family pictures to each recipe. The recipes were her's that she had made over the years, and each one was put into a clear sleeve and each sleeve was put into a 3 ring binder. On the cover she put a picture of me & my brother at Christmas time when he was about 3 years old.
She made this back in the early 90's before Shutterfly and other such sites where you can create your own book. Every little bit of the book she did by hand for me, and I treasure it dearly. The only problem I have with it, is that my mom eats meat. I do not. So unfortunately, most of the main course recipes are meat related. But I have made numerous recipes from the desserts and veggies sections & they are all wonderful.
The best part is that because it's a three ring binder, I've added my own favorites to it & so has my husband. So it's something that has become an heirloom and a family project. One that I will pass on to my daughter one day as well.
I haven't tried every recipe in the book, but today, I wanted to try one of her recipes. So I tried the banana cake one since my husband loves anything banana & I figured it would be a big hit.
I made it, and as predicted, my husband loves it.
So here's the recipe unaltered:
1/4 cup butter
1/4 cup vegetable oil
1 cup sugar
2 eggs, well beaten
1 1/2 cups flour
3/4 teaspoon ground cloves
1 teaspoon cinnamon
3/4 teaspoon baking soda
1/4 teaspoon salt
3 ripe bananas
Mix the flour, baking soda & spices in a small bowl and set aside.
Mash the 3 bananas in a small bowl and set aside.
Cream butter, oil and sugar until creamy.
Add the beaten eggs
Add the dry ingredients alternating with the mashed bananas.
Mix well.
If making cupcakes, pour batter in cupcake liners and cook for about 30 mins until golden brown.
If making as a cake, bake for about 45 minutes.
It's basically banana bread, but a little more cakey.
The reason it's called "Seth's Banana Cake" is because when Seth, who is my little brother, (and I use the term "little" loosely here since he's 20 & taller than me) was 2 he stomped on a bunch of bananas on the kitchen floor. They weren't ruined, but they were too mushy to eat. So my mom decided to whip up this cake for him out of the trod upon bananas & it came out so good, she's made it ever since.
Saturday, May 16, 2009
Rhubarb and Oatmeal.
However, I became totally distracted by this Rhubarb and Oatmeal recipe from Omnomicon.
I made it today & it was awesome! I'm in love!
Rhubarb is the bastard love child of an unholy union between a beet and celery.
There's really no other way to describe it.
They're tart, crunchy and cook up BRIGHT RED. They're most commonly used in crisps and pies along with strawberries, but personally, I like their tartness & find the addition of strawberries to be distracting.
So when I came across this recipe I had to make it. NOW. It took about half an hour combined of prep & cook, and as an added bonus, it's pretty to look at.
So here's what I used:
3 medium sized stalks of Rhubarb
1/2 cup of sugar
oatmeal prepared per directions on box
vanilla yogurt.
Cut the rhubarb into small chunks
toss with sugar and place into a pan and cook on medium heat until the chunks become jucy and syrupy
Turn the heat down to low, make oat meal the way you like it.
(I like mine with brown sugar and cinnamon so that's how I made it)
When the oatmeal is done, serve with the rhubarb & yogurt and enjoy.
The three ingredients here are so lovely together I tried to eat this a little bit at a time with the intention of keeping the aestetics intact.
However, it was so delish that I finally gave in & just stirred the whole mess together & devoured.
Sunday, May 10, 2009
Black Beans & Rice
This is easy, vegan, fat-free & one of my favorite things to make
Plus, it's really pretty to look at.
What you'll need:
2 cans of black beans, drained & rinsed
cilantro
1 cubanelle pepper
1/2 a yellow vidalia onion
green onions
several cloves of garlic
olive oil
in a pan, pour enough olive oil in to coat the bottom & heat.
add minced garlic & onion & saute until barely brown.
then add the finely chopped pepper & green onions
then add the black beans & cilantro
saute for a couple of minutes
salt & pepper to taste
serve over rice.
voila.
up next: chocolate covered strawberries
Sunday, April 19, 2009
Cole Slaw
This is for The Picky Hubby. He's slightly tactile defensive so everything he eats has to have a particular texture. That is to say, it must have resistance. If you want to get astrological about it, he's an Aries, so he likes it when even his food fights back.
Cole Slaw is the perfect food for him.
crunchy & fights back? -check
raw veggies? - check
salty & vinegary? -check
he doesn't have to heat it up at work? - check
So I decided to have a crack at it. It only has a few ingredients; so how hard could it be?
Here's what I used:
- 1/2 head of green cabbage, shredded
- 1/2 head of red cabbage, shredded
- 3 large carrots, shredded
- 1/2 cup apple cider vinegar
- 1/2 cup white vinegar
- 1 1/2 cups of mayo ( personally, if i were making this for me, I would have used Vegonaise to veganize it. but this is for him & he's very fussy about his mayo.)
- 1/2 tsp of salt
- pepper to taste.
mix it, chill it, eat it.
volia.
Carrot Cake Cookies
Like my reto diner plates?
I found them at an antique store in Nashville many years ago & I love them dearly. If I could find more dishes just like it, I'd probably sell a kidney to get them if I had to. Grandmas china? Bah! Gimme good old fashioned pink & black diner plates & I'm happy.
Anyway, I'd been nosing around online for a good, yet fairly easy carrot cake cookie recipe, and I found this one at Gastonomy & it's wonderful!
I did modify it a bit since the recipe called for raisins. (see the oatmeal cookie recipe for my feelings on those nasty little buggers)
Also, I made the filling per the directions, but found it way too ... runny, yet lumpy? it was bizzare. I couldn't get it to the right consistency even with a pound of powdered sugar. And at that point it was just gross. So I skipped the filling. And that's just fine, because these cookies are so good, they can stand alone. I think the filling would be too distracting, anyway.
Carrots are eaten on a daily basis in our household. I swear my husband would be dead if it weren't for carrots. We probably all have that nice orange glow you get when you eat a lot of carrots. I don't care. So aside from the failed filling attempt, these came out fantastic!
You will need the following:
- 1 1/8 cups flour
- 1 tsp cinnamon
- 1/4 tsp ginger
- 1/4 tsp allspice
- 1/2 tsp baking soda
- 1/2 tsp salt
- 1 stick of unsalted butter, softened
- 1/3 cup plus 2 tablespoons packed light brown sugar
- 1/3 cup plus 2 tablespoons white sugar
- 1 large egg
- 1/2 tsp vanilla
- 1 cup coarsely grated carrots (2 medium)
- 1 cup of chopped walnuts
With an electric mixer, beat together the butter, both sugars, the egg and vanilla in a bowl until completely mixed. About 3 mins.
Add carrots and nuts at low speed. When that's completely mixed, add the flour mixture a little bit at a time. Keep the mixer speed on low to medium.
Drop large spoonfuls onto a parchment lined baking sheet & bake at 375 for about 15 mins or until they're just golden brown.
This recipe makes about a dozen. But because these were supposed to be sandwich cookies, I made two batches. And even though I'd planned on taking some to work, 2 dozen cookies is a little much. Especially when you consider I had already made oatmeal & honey cookies this weekend too.
So I enlisted the aid of my taste testers. The neighborhood kids. 4 out of 5 liked them and I like them, so this ones a keeper too.
Old Fashioned Oatmeal Cookies
But not just any oatmeal cookies. I'm very picky when it comes to oatmeal cookies.
I don't like them with raisins because raisins are an abomination, and I don't even like them with chocolate chips. I don't like them with anything but oatmeal and cookie.
Finding a recipe to fit this criteria was more difficult than I had imagined.
But, happily, I did locate one that suited my pallet at Thibeaults Table & they're perfect!
They're low on the oats, and heavy on the cookie but not so heavy that you'd miss the oats.
Perfection!
Recipes From Thibeault's Table
- 1 cup butter
- 1 cup sugar
- 1/2 cup packed brown sugar
- 1 egg
- 2 tsp vanilla
- 1 2/3 cup flour
- 3/4 tsp baking soda
- 1/8 tsp baking powder
- 1/4 tsp salt
- 1 tsp cinnamon
- dash nutmeg
- 1 1/2 cups rolled oats
In a small separate bowl, combine flour, soda, baking powder, salt, cinnamon and nutmeg.
In a larger bowl, cream butter and sugars together until light and fluffy.
Add egg and beat until smooth.
Add vanilla and beat on low
Stir the combined flour, soda, baking powder, salt, cinnamon and nutmeg into butter mixture.
Add rolled oats a little at a time & beat on low with each addition
Roll into medium sized balls
Bake 12-15 minutes or until bottoms are golden.
Cookies should not get brown.
Remove from oven & cool on rack
A dear friend came by just as I was taking these out of the oven & we sat on the back porch in the sunshine nibbling on these beauties. It was a very good day!
Awesome Asparagus
Since it's been Asparagus season, I've been eating these little bad boys like crazy.
I hated them as a kid, but i love them now and so does my daughter. My picky husband? mmmnot so much. But that's ok because my daughter would eat nothing but Asparagus all day if i let her.
I think the reason I didn't like them when I was a kid was because of the way my mom cooked them. They were limp, soggy and a nasty shade of green. So, Mom, take notes!
But the way I cook them is fantastic! I'd love to be able to tell you where I found the recipe, but because it was so simple, I didn't save it & have totally forgotten where I saw it
Anyway, here's what I do:
1 bunch of Asparagus
1 lemon
1 Tbs Olive oil
cracked sea salt to taste.
Wash the Asparagus and chop of the bottom portion.
Arrange in a baking dish & drizzle the olive oil over them & toss gently with a fork
Add sea salt & toss again. After the second tossing, add more sea salt.
Cut the lemon into thin slices, but leave the ends of the lemon as wedges. Squeeze the juice from the wedges over the Asparagus, then discard the wedges. Place the lemon slices over the Asparagus.
Bake in oven at 350 for 20 mins then serve (add more sea salt if you're a salt addict like me)
Heaven, I tell you. Heaven. My child will devour these faster than I can keep them on her plate!
Also, Asparagus are incredibly healthy. There's all kinds of good info on the Wikipeida article on them. Follow the jump to read up on Asparagus.
"Asparagus rhizomes and root is used ethnomedically to treat urinary tract infections, as well as kidney and bladder stones.[citation needed] In Ayurvedic medicine (a traditional medicine of India) a type of asparagus (asparagus racemosa)called Shatavari in Sanskrit is widely used as a tonic, and for women's problems. Shatavari means "Plant of the 100 roots". Because of it's reputed aphrodisiac properties it is also known as "lady with the 100 husbands".
hm! interesting!
The Apple Pear Conflict
but every time I said it to my husband, he kept hearing Conflict instead of Compote. So it's officially been named The Apple Pear Conflict.
And it's dang good!
I found this at The Picky Cook
and it's now become a staple in our household.
It also helped that I found vanilla beans on sale & bought up as many as my little cart could hold.
This is the first recipe I've used fresh vanilla beans with & although there isn't a noticeable difference in taste, it does make for a good presentation.
The Ingredients are as follows:
2 cups apple cider
1/4 cup cider vinegar
1 Tbsp brown sugar
2 tsp unsalted butter, divided
3 medium (about 1 lb total) Granny Smith apples, peeled, cored, small diced
3 medium (about 1 1/2 lbs total) pears, peeled, cored, small diced
(Bartlett pears were recommended, but I just red anjou & it came out great)
1 vanilla bean, split in half lengthwise
Combine apple cider, cider vinegar, and brown sugar in medium saucepan. Simmer on medium-high, uncovered, stirring occasionally until reduced for about 10 to 15 mins.
Melt the butter in a pan on medium. Add apples, pears and cook for abotut 5 minutes until softened.
Using a sharp knife, split the vanilla bean pod length wise. Using a butter knife or a spoon, scrape tiny seeds from vanilla bean into fruit mixture. This can get messy & the seeds can stick to your hands, so be careful. When all of the seeds are out, discard the pod.
Stir in the reduced cider glaze and simmer until there's no more liquid in the apples. It should have a sticky, glazed consistency.
Remove from heat & allow it to cool some before serving. I eat this over fat-free vanilla yogurt, but my daughter likes it with vanilla bean ice cream.
The best thing about this, is that it's easy to make & it's really tasty and versetile. You could serve this on cake, ice cream, yogurt, or just eat as is.
Sunday, March 29, 2009
Honey Cookies
Today, however, I had a mad craving for honey cookies. So I looked up recipes for them. I didn't really expect to find any good ones, but I did come across this one called Honey Bee Cookies from cooks.com. I made it today (with minor alterations) and they came out great! They almost taste just like the ones from Beckers! They are however, very sweet. Even for me & I love sweets. I don't remember the ones from the bakery being quite so sweet, but then, it's been a good 10 years since I've had theirs. So it's hard to judge. But my little one liked them too, so I'll make them again.
Now that I'm on a a cookie making roll, I will only send my home made cookies in her school lunch. I really don't want her to have all the preservatives & junk that are in store bought pre-packaged cookies. Cookies are not meant to have a year long shelf life. They are to be eaten and enjoyed immediatley. But she wants cookies, and my husband likes to have one with lunch too, so I usually end up making big batches on the weekends.
And although I don't think my husband will like these, I think they came out pretty good.
here's the recipe:
Honey Cookies
- 1/2 cup packed brown sugar
- 1 stick of butter, softened
- 1/2 cup honey
- 1 egg
- 2 cups all-purpose flour
- 1/2 tsp. baking soda
- 1/2 tsp. salt
- 1/2 tsp. ground cinnamon
1. Heat the oven to 375 degrees.
2. Beat butter, brown sugar, honey and egg in a medium bowl on medium speed, scraping bowl constantly, until smooth. Stir in remaining ingredients.
3. Drop the dough by Tablespoon fulls onto a parchment paper lined cookie sheet.
4. Bake until set and light brown around edges 8 to 12 minutes. Let stand 3 to 5 minutes before removing from cookie sheet, then remove from cookie sheet with metal spatula onto a wire rack. Makes 12 cookies.
Sunday, March 22, 2009
Spiced Chocolate Guinness Cupcakes
I was so excited when I found this recipe here at Foodess, that I absolutely HAD to make it THIS weekend. It simply couldn't wait another week. Finances be damned! We MUST have Guinness Cupcakes!
I've been eyeballing a lot of variations on chocolate Guinness baked goods, but this one seemed to be the most simple & straightforward recipe that didn't require me to purchase new kitchen equiment.
And unlike just about every other recipe I make, I didn't alter this one little bit.
Ok, well, not the cupcake part anyway. I did use my own butter cream frosting though.
So here it is:
- 1 1/2 cups sugar
- 1 3/4 cups flour
- 3/4 cups cocoa
- 1 1/2 tsp baking powder
- 1 tsp salt
- 1 tsp cinnamon
- 1/2 tsp nutmeg
- 1/4 tsp allspice
- 2 eggs
- 1 cup soy milk (alright, so i altered that one little thing. the original calls for regular milk)
- 1 tsp vanilla
- 1/2 cup butter, melted
- 1 cup Guinness beer
1. Heat oven to 350 degrees and line two muffin tins with paper liners. Whisk together sugar, flour, cocoa, baking powder, salt, and spices.
2. In a separate bowl, blend together eggs, soy milk, melted butter*, beer, and vanilla. Add to dry ingredients and beat on medium speed of electric beaters for 2 minutes. Fill cupcake liners to three quarters full. Bake for 25 minutes, or until inserted toothpick comes out clean. Cool completely before frosting.
*be sure to use beer that is at room temperature. I would recommend leaving a bottle out overnight in fact. I had left a bottle out for about an hour before making this, but it was still cold. Which meant that when I added it to the melted butter, it immediately solidified the butter. Somehow, I don't think this was the desired effect. But it worked out anyway.
I used the same frosting from the Vanilla Rum Spice Cookie recipe.
Personally? I think these ROCK! It's a perfect blend of Guinness & chocolate without one overpowering the other. I will totally make these again. And again and again..
But, that is just me. If you're not a Guinness fan, then these probably wouldn't do it for you. I, however AM a fan & these DO work for me very well!
I'm so glad I didn't wait to make these! Yum!
Vanilla Rum Spice Cookies
These are SO good!
When I took them out of the oven last night, I gave my husband a small bite. Just to see if he'd like them.
And I swear to you, I thought his eyeballs were going to roll back in his head, and all he could say was "MORE OF THOSE!!"
Yep! That's what I was going for! Now, I gave him the un-frosted variety because he doesn't like frosting at all. But they're really good either way.
The funny thing about these, is that they're not what they're supposed to be. They're supposed to be Root Beer Cookies. I found this great little recipe here at Makes and Takes. And thought that was a brilliant idea!
Unfortunately, I couldn't get my hands on any root beer flavoring. But I did have some rum flavoring hidden in the back of my spice rack & it's been begging me to use it for over a month now. So, I thought, what the heck? I'll give it a shot.
And y'know what?
They're divine! I don't think I'm even going to try the root beer version now!
Here's what I did:
Makes about 2 dozen
- 1 cup vegan butter
- 2 cups light brown sugar
- 2 eggs
- 1 tsp imitation rum extract
- 1 tsp vanilla extract
- 3 1/2 cups flour
- 1 tsp. baking soda
- 1 tsp. salt
Cream butter and brown sugar until very light and fluffy. Add the eggs one at a time, beating well after each addition. Add the rum & vanilla extracts. Whisk dry ingredients together. Add a little at a time to the creamed mixture. The dough should be slightly sticky
Chill for at least an hour.
Preheat oven to 350 degrees F. Lightly grease several baking sheets, or line them with silicone baking mats or parchment paper. Roll into balls & place on cookie sheet. With a spoon, press down on the top of each ball, so it's flattened a little bit.
Bake for 6-8 minutes. More if you're cookie balls are a little bigger. When done transfer to a plate or paper towels to cool.
My frosting is a little free-form and I make it a little differently depending upon what it's going on. For these cookies, this is pretty much what I did:
- 1 stick of earth balance butter
- 1 teaspoon of vanilla
- 1/2 cup soy milk
- 1/2 teaspoon of nutmeg
- a whole lot of powdered sugar
mix all ingredients together well and keep adding the powdered sugar until you get a nice stiff consistency.
Then I filled the little spoon sized depression on top of the cookies with the frosting, and volia!
I suppose you could cover the whole cookie with frosting, but in my personal opinion, the flavor of the cookies is subtle and delicate and too much of the frosting would be overpowering. Plus, they look pretty with just a dab of frosting.
Everyone in my household LOVES these, so this recipe is definitely a keeper!
Saturday, March 21, 2009
Wow!
I haven't posted in a long time.
It's been busy in my house & I haven't had a lot of computer time in the past few weeks. And on the rare occasions I can get to the computer, I've spent catching up with an old friend I haven't talked to since 7th grade!
facebook is an amazing thing.
So, in the past two weeks I've still tried new recipes, but I did the quick and dirty versions of them to save time and a little money. Eventually, I'm sure I'll do them the slow and clean way, but since I'm pretty happy with the results I got, I think I'll stick to my way for now.
The first thing I tried was Dragon's Rice Pudding.
Now let me say, my mothers rice pudding is a wonderful thing. This is total comfort food for me & it's what I want to eat on the occasions I need my mama.
However
my mothers rice pudding recipe is...difficult. It requires kitchen equipment I don't own
(ie: corning wear and/or a casserole dish. since i'm vegetarian i don't own such things) and although I do love rice pudding, it's really not worth going out & buying these items I'll never use for anything other than rice pudding.
So, I had been searching around for a rice pudding recipe I could do on the stove top. And Voila! Dragon had one posted that's perfect! (have i mentioned how much i love Dragons blog? No? Well, I do! Great recipes there!)
Unfortunately, the craving for it was high, and resources were low. So I made do with what I had.
And this is what I did:
Cranberry and Lemon Rice Pudding by Dragon
Ingredients:
1 1/2 cups water
2 cups soy milk
3 strips of lemon rind
1 teaspoon of cinnamon
Pinch of salt
1/2 cup short-grain rice
1/2 cup sugar
1/2 cup dried cranberries
1 large egg, beaten
Directions:
1. In a saucepan combine water, milk, lemon, cinnamon and salt. Cover and bring it to a boil, over medium heat.
2. Reduce the heat to medium-low and add the rice. Cook the rice, uncovered for about 25-30 minutes or until the rice is almost tender. Stir often.
3. Add the sugar and cranberries. Cook for another 5 to 10 minutes or until most of the liquid is absorbed. Remove the pan from the heat.
4. Stir in the egg quickly until well combined. Return the pan to the heat until the rice is slightly thickened. Stir constantly. Remove the lemon rind. Cool the rice to your desired temperature.
Spoon into bowls and sprinkle with ground cinnamon and/or lemon zest.
The pudding is on the left in the picture up there. That's my little wanna-be bento box. I spend way to much free time oogling bento sites. some day i'll go there. some day...
on the right hand side of the picture is the other new recipe I tried.
Again, this is the quick and dirty version of the origianal which you can find at Buff Chickpea
1/2 a bag of red potatoes
2 onions, sliced
2 tablespoons olive oil
1/3 cup vegetable broth
1/2 teaspoon garlic powder
1 Tablespoon lemon juice
Sea salt & pepper
Preheat oven to 400 degrees.
Place the cut up potatoes in a greased baking dish Set aside while you make the lemon dressing.
In a medium bowl, combine olive oil, lemon juice, broth, oregano, garlic, and a little salt and pepper. Pour the dressing over the potatoes, and give everything a good toss.
Sprinkle with additional kosher salt and cracked black pepper and put into your preheated oven.
Bake for 30 minutes, give the potatoes a toss, then bake for an additional 45-50 minutes, tossing every 20 minutes or so.
Personally, I really liked these. Never, thought they were ok. He didn't hate them, and he ate them, but he said he likes the crash potatoes better. But I made them again anyway for me, because they're fast, yummy, filling and re-heat really well!
Sunday, February 22, 2009
Peanut Buttercups
And i couldn't resist. She made it look so simple and wonderful and I had to go out to the store that very minute and get the ingredients to make this.
There are four. yes FOUR ingredients to this amazing creation.
They are:
Chocolate Chips (2 medium sized bags)
Peanutbutter ( 1 cup )
Powdered Sugar (1/2 a cup)
Vanilla. (1 tsp)
(Plus cupcake liners.)
That's it! I swear!
For the filling:
mix the peanut butter & sugar well. Add the vanilla & set aside.
For the chocolate shell, melt the chips in a double boiler, mircowave, or like me, go all ghetto & put one small pot with the chocolate in it , resting on top of a slightly larger pot with boiling water inside.
I don't have a double boiler, and this was the first time I've worked with chocolate. But hey, it worked! I set the water in the larger pot on high & once it got to a good rolling boil, I placed the smaller pan of chocolate chips on top & turned down the heat a little. I stirred it constantly until it was totally melted
Once the chocolate has melted, spoon a little bit into each cupcake liner. Then, spead the chocolate up the sides of the liner & leaving a healthy dolop of chocolate in the bottom of the liner. It should look like this:
Once all the liners are totally coated, place the muffin tin in the refridgerator for about an hour until the chocolate has become solid again.
Then remove the shell-filled muffin tin from the fridge & fill each shell at least half way full of the peanutbutter mix. More or less depending upon how you like your peanutbutter to chocolate ratio.
Then start the water boiling again & put the chocolate back on to get it warm and soft again. And at this point, if you're like me, you'll need to add more chips so you'll have enough chocolate for the covering.
Then spoon the warm chocolate over the peanutbutter in each shell. Be sure the peanutbutter it totally covered & that the chocolate completely touches the edges of the cupcake liner so that a seal is formed over the peanutbutter.
Then put the muffin tin back in the fridge so that it all becomes solid.
Technically, I suppose you should probably wait at least a good 2 hours for it to totally solidify. But i just couldn't wait that long. I waited for about 45 minutes & just couldn't stand to wait one more minute.
They were mostly solid. Solid enough.
And this is what it looked like when I took a bite.
Now, please note, these are NOT for diabetics. In fact, about half way through, I thought was going to go into a sugar coma. Even my daughter couldn't finish a whole one. My teeth hurt. But, dang!! It was worth it! And yes, ohhh yes, I will be making these again!
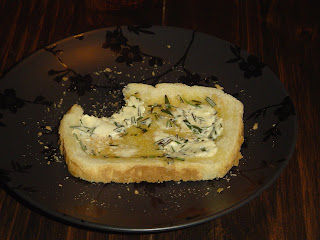
Rosemary Garlic Butter
I found this idea over at Feed Yourself, bookmarked it & promptly forgot all about it.
Until this morning. I was sifting through my bookmarks & came across this & thought, 'yeah i could totally do that right now!'.
So i did. And it came out great! Two thumbs up from my husband. We're both big fans of rosemary, so pretty much anything involving rosemary will be a hit in our household.
The best thing about this, is that it's so unbelievably easy and versatile and yet so incredibly good.
Here's what I used:
1 stick of earth balance left out to soften
a bunch of rosemary, minced
some garlic poweder
a pinch of kosher salt (yes, i DO put it in just about everything)
mix all the ingredients in a bowl
Then spread into the shape you want onto a sheet of waxed paper & wrap.
Place in the fridge until it's solid again
Then spread on toast & enjoy
As you can see, the toast didn't last long enough for me to get the picture. My husband attacked it before I could grab my camera.
In his words "That butter is the bomb!"
ie: it's very good.
Saturday, February 21, 2009
since it is caturday...
technically, he's a stray. maybe. my daughter says that someone in the neighborhood told her that he belongs to a house a couple of streets over.
but he decided he likes our house better, apparently, and has moved in with us. i'm a sucker for strays, so i've fed him & let him have the run of the house.
he's super sweet, docile & extremely affectionate. and he likes to be carried around like a baby. which i do, frequently.
Righteous Tomato Soup
Then one day I went to grocery store & the clerk accidentally rang up 2 cans of diced tomatoes that belonged to the person behind me. I didn't notice until I got home & figured this was some sort of sign to go ahead and try the tomato soup.
I dug around online to find a recipe that included all of the ingredients I had in mind and came across this little beauty from The CD Kitchen.
And let me tell you
This soup is the bomb diggity! I'm in love & it's my new favorite, and best soup I've made yet. hands down! It's definitely in the OHMYGOD THIS IS SO GOOD!! category.
I make all my soups in my crock pot because I'm busy & have a very short attention span. So it's better for me to make soup slowly when I don't have to constantly keep watch on it. So I could smell this one cooking all day & I could barely stand it! As soon as it was done, I poured my self a big bowl & dug in.
And I ate every last drop. It was *that* good. Seriously.
So here's what you'll need:
1 medium onion, diced
2 stalks of celery chopped
3 cloves garlic, minced
3 tablespoons unbleached whole wheat flour
4 cups vegetable stock
2 cans (14.5 oz size) tomatos
1 can of tomato paste
1/4 tsp of dried red pepper
2 bay leaves
fresh orgeno to taste
2 teaspoons of fresh basil
¼ cup of soy milk (totally optional. i usually leave it out entirely & don't notice a difference)
1/2 tsp of lime juice
kosher salt & cracked black pepper to taste
Put the crock pot on the "High" setting.
2. While it's melting, chop up the onion, garlic & celery & add them to the pot.
3. Stir well & to coat the veggies with the butter
4. While they are simmering, chop of the fresh Oregeno & Sage and add to the pot.
This was the first time I've used fresh oregeno & it was wonderful.
5. Stir all ingredients well and add the red pepper, kosher salt & black pepper to taste.
6. Still well & cover pot. Switch the crock pot setting to "Low" and allow to simmer for 15 minutes or so, stirring occasionally.
At this point, the mix already smelled so good I was practically drooling. I was very seriously considering eating this as is. Maybe over pasta or on bread. It smelled that good.
It should look something like this. All veggies should be coated in the butter and simmering .
7. Add the flour and stir well
8. Stir in the canned tomatoes
9. Stir in the can of tomato paste, and you'll have a nice happy mixture like this.
10. Add the vegetable stock and lime juice. Stir well and place lid back on pot.
11. Leave this to cook for about 4 hours, stirring occasionally.
12. Put the soup in a blender until it comes out with a creamy consistency.
13. Pour in the soy cream and stir well.
14. Serve and devour!
I put some of this in containers in my freezer for work. But I also set some aside in my fridge because I know I'm going to want another bowl tomorrow.
Or maybe even later tonight...