Showing posts with label baked goods. Show all posts

Monday, January 17, 2011

Monkey Bread

isn't it beautiful?

it was most delish, too.

of course, The Picky Hubby wouldn't eat it beause "any food with the word 'monkey' in must be dirty"
sigh.
but me & my daughter ate it and love it.

i found this at Gimme Some Oven and have only made it once. It came out really good, however, I found the measurements to be a little off.

i had a LOT of butter and sugar left over, and let me tell you, i really coated the heck out of the dough bits. So i think that the next time i make this, i'll half the butter and sugar amounts, and it should be just fine.

Tuesday, March 23, 2010

Blueberry Cake

blue berry cake


from Smitten Kitchen of course

i just used blue instead of rasp.

light fluffy

low on sugar

high on yummeh.

Monday, March 15, 2010

Classic Sandwich Bread

I found this recipe on the back of the bag of King Arthur Flour and it's fantastic!

The critics (meaning my husband and coworkers) have deemed this bread to be righteous.

The recipe looks a lot more complicated that it actually is, and there are only 2 things I did differently. 

1. The recipe calls for 3 Tablespoons of sugar, but that was too sweet for my husbands pallet, and really, I just think thats too much sugar for bread. So I reduced it to 1 Tablespoon and he liked that much better.

2. I have to make this bread while I'm cooking other things in the oven because my house is too cold for the bread to rise naturally. So I leave the loaf on top of the oven to rise before I bake it, and right before I pop it into the oven, I brush the top gently with a little bit of olive oil

The bread is dense, but not too heavy and it's very tasty. It really is perfect for sandwiches and grilled cheeses.

Sunday, February 14, 2010

Eat My Tattoo aka I Love Shortbread


My husband & I don't really do anything for each other for Vday now that we're married. It just seems silly & a waste of money. We get our daughter Valentines but that's pretty much it. So I decided to make some Valentines day cookies for her with my heart cookie cutters.

Then, I realized that I have black food coloring I've never used.

And thought it would be great to make black heart cookies for my husband and red ones for my daughter. Then I thought I would use some gel frosting to add a little red heart to the black heart cookies.

Then I realized that I had a bat cookie cutter.

This meant I could make edible versions of my tattoo!

I was so excited!

So, I used my shortbread recipe I posted earlier, with a couple of  Tbsps of milk added and used 1 Tbsp + 2 tsps of black food coloring and baked.

They came out great! I made heart ones too, and plan to ice "WWJJD" onto those later today.

I gave my husband a tattoo cookie and he laughed his butt off!

Monday, January 18, 2010

Spice Cake Sammich Cookies


Spice Cake is the one box-cake that I lovelovelove. really. srsly. LOVE.

Then, while browsing around the foodie blogosphere, I ran across recipes for Spice Cake Cookies!

OMG Good!

SWEET!!

but GOOD!

I found the one I liked best on The Crepes of Wrath

I liked it the best because it was so simple.

Ingredients:

1 Box of Spice Cake Mix (do not follow directions on box. disregard them entirely)
1 stick of softened butter
1 egg at room temperature

Mix everything up

Roll into balls & then flatten the balls a little

Place on cookie sheet and bake at 350 for about 8-10 mins (depending upon the size of your cookies)

Cool on a rack.

When they are completely cooled, spread butter cream frosting on the bottom of one cookie & stick to the bottom of another cookie.

voila!

Butter Cream Frosting :

(bear in mind that all recipes for butter cream frostings are merely guidelines. there's no exact science to it & what you put in it and how it comes out really depends upon your preference. the following is my general preference, but that's subject to change as well. )

1 stick of butter
a bunch of powered sugar (roughly 2 cups)
1 teaspoon of vanilla
1/2 teaspoon of cinnamon
1 Tbs of milk

beat with electric mixer until smooth. add sugar & milk until you achieve the consistency that suits you best.

Sunday, January 17, 2010

Sunday Cinnamon Rolls

 \

Bread has been working well for me lately & this is my latest project.

I found the recipe I liked at Epicurean Escapism and modified it just a little.

Buttermilk Cinnamon Rolls * now with flour!


Ingredients:

for the dough:

  • 2 tbsp sugar
  • 2 3/4 cup all purpose flour
  • 1 1⁄4 tsp baking powder
  • 1⁄2 tsp baking soda
  • 3⁄4 tsp. salt
  • 1 1⁄4 cup buttermilk
  • 6 tbsp melted butter

For the filling:
  • 2 1/2 tbsp. melted butter
  • 2 tbsp. sugar
  • 1 tbsp. cinnamon
  • 1/4 tsp vanilla

For the glaze: (i don't always follow this exactly. sometimes i add cinnamon to this as well. also, i make enough to cover the rolls & the extras)
  • 2 tbsp. water
  • 1 cup powdered sugar
  • 1/4 tsp vanilla

1. Preheat oven to 425°F

2. In a bowl, mix together the flour, sugar, baking powder, baking soda and salt to form the dough.

3. Stir in the butter and buttermilk.

4. Mix well. The dough will be thick and gooey, so at this point I usually knead it right in the mixing bowl to incorporate all the ingredients and little dry morsels, before placing on the floured surface of my counter.

5. With floured hands, gently knead the flour into the dough until smooth.6. With a rolling pin, roll the dough out into a square of approximately 1⁄2 inch thick.7. Spread the surface of the dough with 2 tbsp melted butter, then sprinkle on the cinnamon and sugar.

8.Go to the edge of the dough with the filling as much as possible, then trim off the edges of the dough so that you have a perfect square & the cinnamon filling is right at the edge of the dough. set the extras aside.

9. Gently roll the dough into a log shape with the filling inside. Trim off the ends if they're not even. Then slice off about 2 inches thick

10. Place the rolls in a lightly greased pan, and bake for about 20mins, or until the edges have turned golden brown.

10. Pour prepared glaze onto the rolls while they’re warm, but have cooled for just a few minutes.

After I've removed them from the oven, I roll the extra dough in a separate dish & bake and glaze those as well as I don't like to waste anything.

sorry! i totally forgot to add the flour when i originally posted this! blogger has a new interface i was fighting with & got totally distracted. 

Tuesday, January 5, 2010

Pizza!


Pizza is one of the precious few things that I can get both my husband and daughter to eat reliably.

And since we're not wealthy, we cannot afford to order out very often, so I usually get the frozen variety.

We've spent years sampling various brands of frozen pizza, and although some are better than others, none have really made all 3 of us happy.

But since I had a smashing success with the pretzels, I decided to have a go at home made pizza.

I was not disappointed.

I used a dough recipe I found at Once Upon A Plate and tweaked it a bit to suit my pallet, and for the sauce I used a portion of my Tomato Bisque recipe, but with a little extra flour added to thicken it up a bit.


Pizza Dough


Yields 1 large, 2 medium, or 4 small pizza crusts

Preheat oven to 500


Ingredients:

1 Tablespoon active Quick Rise

Pinch sugar

3/4 cup very warm (not hot) water

1 3/4 cups all-purpose flour

1/2 teaspoon salt

¼ teaspoon dried oregano

¼ teaspoon dried basil

salt and pepper to taste

½ teaspoon garlic powder


In a small bowl or glass measuring cup dissolve the yeast and sugar in warm water, stir and set aside for 10 minutes.

Mixture should begin to bubble and foam at the end of the time

While the yeast is dissolving, in a medium bowl, combine flour and salt, pepper and herbs and set aside.

Add the liquid yeast mixture to the dry ingredients and stir until well combined.

Flour a work surface and knead dough for a couple of minutes until smooth and elastic.

Using a rolling pin, roll the dough into 1 large, 2 medium, or 4 small pizzas.

After the dough is rolled out, gently lay on a pizza pan and add sauce, fresh herbs of your choice, cheese and toppings

Bake in hot oven until as crispy as desired. Usually about 10 minutes in my experience.

Serve and enjoy!


This is something that is actually very quick. Once I had the sauce made up and the toppings I want, the whole process takes about 20 minutes from dry ingredients to on my plate. It takes no more time than a frozen pizza does to cook, and it's much healthier .

So, now, my fam wants this all the time and I'm happy to oblige.

Sunday, January 3, 2010

The Best Shortbread Cookies Ever.


That's a pretty strong statement, I know.

But I feel that strongly about these shortbread cookies.

I'm not normally a fan of the stuff, more my mom's thing than mine, but these are good and easy.

I found the original recipe at TSG, and made them the first time as recommended with Nutella.

And they were good.

But then, I thought that they would also taste good with a little strawberry jam instead. So I tried them that way last night, and I actually like that way even better.


Ingredients:

  • 2 sticks of butter, softened
  • 1 cup powdered sugar
  • 1 teaspoon vanilla extract
  • 2 ½ cups all-purpose flour
  • ¼ teaspoon salt

Preparation:

In a separate bowl, sift flour and salt together. In the mixers bowl, cream the butter and sugar with an electric mixer.

Beat in the vanilla extract.

Gently add the sifted flour and salt mixture into the creamed butter and sugar, and mix on low until well blended. When the mixture is dry and crubly, add 2 teaspoons of milk to the mixture, until everything comes together.

Form the dough into a disk, then wrap it in plastic wrap, and chill it in the refrigerator for about an hour (or until the dough has firmed-up).

Preheat oven to 350ยบ. Line two baking sheets with parchment paper.

Take the dough out of your refrigerator and roll the dough out on a lightly floured surface to ¼ of an inch thick. Using the cookie cutters of your choice, cut out the cookies & place on the lined baking sheets.

Bake cookies for about 10 minutes or until the cookies have lightly browned. Cool for 5 minutes on baking sheets before proceeding to cool the cookies on a cooling rack for about 15 minutes.

After the cookies have cooled, spread Nutella or the jam of your choice on half of the cookies, and sandwich the cookies together.

Saturday, January 2, 2010

Holiday Treats

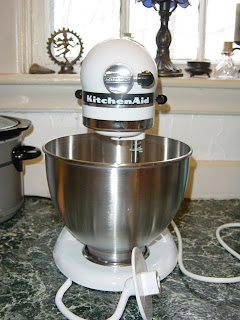
First and foremost, I would like to thank my mom & stepdad for giving me this beautiful mixer for christmas. I was so excited about it that I started to hyperventilate. My mom didn't know if that I was happy or upset, so my husband had to translate that I was in fact, very, very happy.

Needless to say, I've already used it & it's magical, wonderful and splendid. My mom took the opportunity to point out that she never thought I'd be so excited over a kitchen appliance & that she was pretty sure this meant I was a 'grown up' now. well. really? it's just a big toy for big kids.

And besides, cooking and baking is playing to me anyway.
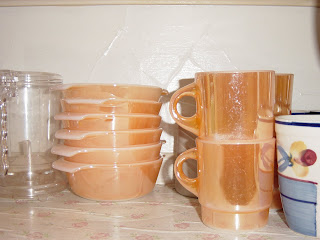
My second thank you goes out to my MIL (mother in law) for bestowing upon me a full set of Anchor Hocking Fireware Lusture mugs, custard bowls and a baking dish!

She found them in her basement. They were leftover from the last family that lived there & in perfect condition. So perfect, in fact, they're like new. They were obviously never used very much. And that will change in short order. But she didn't want them. Can you believe it?! She didn't want them!

She is aware of my secret love, no, obsession with vintage dishes ( i can correctly identify make, style and patten of depression glass at 30 paces) so she asked me if I wanted these. OF COURSE I WANTED THEM! I'm in heaven! Tonight, I'm making homemade pizza with dough and sauce from scratch. Then, for dessert, I'm going to use these beautiful little custard dishes to make individual chocolate puddings with a recipe I found at Chat and Chew.

But before I get to that, I do want to post what I made for myself for my birthday with my new mixer.

Home made soft Pretzles!

I found this recipe at Picky Cook and didn't alter a thing about it.

It's labor intensive, and eats up a chunk of my day, but goodgod, it's well worth it. My husband wolfed down four without stopping to breathe.

So here it is, try it & you won't be sorry, I promise!

Makes 16

2 cups warm water
1 tablespoon + 2 tablespoons sugar
1 packet active dry yeast
5 to 6 cups all-purpose flour, plus more for dusting
1 tablespoon salt
2 teaspoons olive oil
1/4 cup baking soda
1 large egg
sea salt

Vegetable-oil cooking spray

1. Pour warm water and 1 tablespoon sugar into the bowl of the electric mixer. Using the dough hook to combine. Sprinkle with yeast, and let sit 10 minutes; yeast should be bubbly.

2. Add 1 cup flour to yeast, and mix on low until combined. Add salt and 4 cups more flour, and mix until combined, about 30 seconds.

Beat on medium-low until dough pulls away from sides of bowl, about 1 1/2 minutes. Add another 1/2 cup flour, and knead on low 1 minute more. If dough is still wet and sticky, add 1/2 cup more flour. Knead until combined, about 30 seconds. Transfer to a lightly floured board, and knead about ten times, or until smooth.

3. Pour a small amount of oil into a large bowl; swirl to coat sides. Transfer dough to bowl, turning dough to completely cover all sides. Cover, and leave in a warm spot for 1 hour, or until dough has doubled in size

4. Heat oven to 450 degrees F. Line baking sheets with parchment paper. ( i used oil greased foil for one batch & they didn't come out very well, so I would recommend the parchment paper)

Set aside. Punch down dough to remove bubbles. Transfer to a lightly floured board. Knead once or twice, divide into 16 pieces

5. Roll one piece of dough at a time into an 18-inch-long strip on an unfloured board. Twist into pretzel shape & transfer to prepared baking sheet. Cover and continue to form the rest of the pretzels; eight will fit on each sheet. Let pretzels rest until they rise slightly, about 15 minutes.

6. Meanwhile, fill large, shallow pot with 2 inches of water. Bring to a boil. Add baking soda (and step back, it foams up quickly) and remaining 2 tablespoons sugar. Reduce to a simmer; transfer three to four pretzels to water. Poach 1 minute on each side. Use slotted spoon to transfer pretzels to baking sheet (I used a drying rack with paper towels underneath - then once they were dry I put them on the baking sheets). Continue until all pretzels are poached.

I'm honestly not sure what this step is about, but every pretzel recipe I've seen calls for this.
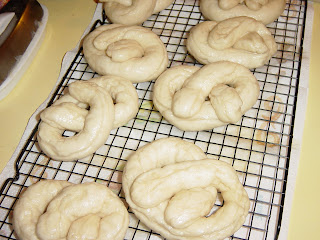
7. Beat egg with 1 tablespoon water. Brush pretzels with egg glaze. Sprinkle with salt. Bake until golden brown, 12 to 15 minutes. Let cool on wire rack, or eat warm.

Pretzels are best when eaten the same day, but will keep at room temperature, uncovered, for two days. Do not store in covered container or they will become soggy. Seriously. I tried to store them in a container later that night & they were immediately soggy. So, I ended up keeping them in the fridge, but the next time I make these, I will absolutely leave them out for at least 24 hours.
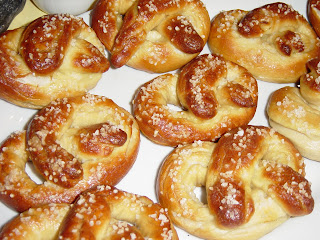
Serve & enjoy! I like them as is, but my hubs covered in spicy brown mustard.

Sunday, December 13, 2009

Cocoa Crinkle Cookies


I found this at "Behind The Skillet" and they are divine!

We hosted a dinner party last night & I made these for our guests and ohmygod they went fast!

They're simple, elegant, moist and petty.
who could ask for more?

Ingreidents:

3/4 cup flour
1/2 cup good quality unsweetened cocoa powder
1 teaspoon baking soda
1/4 teaspoon salt
1/2 cup (1stick)
1 1/4 cup sugar, plus another 1/2 cup sugar
2 eggs
2 tsp vanilla


Step 1: In a large bowl, sift together the flour, cocoa, baking soda and sal. While you're doing this, Melt the butter in a saucepan. Once the butter is totally melted, set it aside and allow it to cool for a few minutes.

Step 2: In a separate bowl, mix the 1 1/4 cup of sugar, eggs and butter. Whisk well until it has a smooth, creamy cconsistency and then add the vanilla. Whisk until well blended.

Step 3: Stir the butter mixture into the dry ingredients and stir well until combined.

Step 4: Wrap and chill in your refridgerator for at least 2 hours or overnight

Step 5: Preheat oven to 350, and line cookie sheets with parchment paper. Shape dough into small balls and roll ina bowl with 1/2 a cup of white sugar. Place balls on the parchment paper and flatten slightly with a spoon.

bake for 12 minutes.

Chocolate Chip Muffins


The Picky Hubby wanted something different for breakfast.
but he wasn't sure what kind of different.
he was just sure that he was tired of corn muffins and banana muffins.

So, I came up with this little recipe and it was a big hit.
He likes the texture & density of the muffins, they fill him up
and most importantly
they go well with his morning coffee.

The Little One loves these as well, so I usually end up making 2 batches of this so there's enough for everybody.

Ingredients:

2 cups all purpose flour
1/3 cup white sugar
1/3 cup brown sugar
2 teaspoons baking powder
1/2 teaspoon of salt
2/3 cup milk
1 stick of butter melted and cooled (1/2 cup)
2 eggs lightly beaten
1 teaspoon vanilla extract
1 cup of chocolate chips (more or less to taste)


Preheat oven to 400 and line muffin tin with muffin cups. In a large bowl mix together flour, white sugar, brown sugar, baking powder and salt.

In another bowl stir together eggs, milk, melted butter and vanilla until well blended. Make a small well in the middle of the dry ingredients and pour in the wet mixture. Stir until well combined and then add the chocolate chips

Spoon mixture into the muffin cups. Bake for 15-20 mins until ligthly brown on top. Allow to cool before eating or storing.


the original recipe calls for an entire 11 oz package of chocolate chips to be added, but personally, that's a bit much for breakfast. And my husband really loves the dough the best in this muffin. the chips are just secondary.

Sunday, September 20, 2009

Cookies For Breakfast!


I found this recipe at Hippie With a Minivan and decided that I must try it.

I made it two different ways. One way for me and one way for my daughter.

For my daughter I stuck to the exact recipe and she loved it!

This is it:

In a medium sized bowl, mix the following:

  • 1 1/3 cup Oatmeal
  • 1/4 cup golden raisins
  • 1/4 cup chocolate chips
  • 1/4 cup flour
  • 1 cup non-fat powdered milk
  • 1/4 cup sugar
  • 1 tsp baking powder
  • pinch of salt
  • 1 tsp cinnamon
  • 1/4 cup pecans

once that's mixed, add in

  • 1 cup Apple Sauce
  • 1 tsp vanilla
Mix it all together & spoon medium sized mounds of the dough onto a cookie sheet lined with parchment paper.

bake at 350 degree oven for about 15 min.

I got 6 good sized cookies out of this recipe & they were fantastic!


Now, what I did for my version of this was the following:

In a medium sized bowl, mix the following:

  • 1 1/3 cup Oatmeal
  • 1/4 cup dried pineapple
  • 1/4 cup white chocolate chips
  • 1/4 cup flour
  • 1 cup non-fat powdered milk
  • 1/4 cup sugar
  • 1 tsp baking powder
  • pinch of salt
  • 1 tsp cinnamon
  • 1/4 cup macadamia nuts
  • pinch of vanilla bean

once that's mixed, add in

  • 1 cup Apple Sauce
  • 1 tsp vanilla
and follow the same baking instructions as above.

These were a big hit & me and my daughter

* * * note: i've been playing around with this & have used different sauces besides apple sauce. i most recently used a sweet potato sauce i made and added cranberries, pecans and used orange extract instead of vanilla & it was even better!

This recipe lends itself to creativity & i try to mix it up every so often.

Monday, September 7, 2009

Peaches


pie
cake
torte?

lets just stick with 'thing'

thing works.

so this is a Peach Thing

that is delish!

i found the recipe here at Whitneyinchicago and modified it a bit.

i've seen this exact recipe on a couple of different sites, and it's one that works for me since it's low on the dairy and high on the simplicity.

Technically it's called Peach Tea Cake.

and it's dang good.

Here's what you'll need:

  • 2 1/4 cups all-purpose flour
  • 1 teaspoon baking powder
  • 1 teaspoon salt
  • 1 cup sugar
  • 1 1/2 sticks of butter
  • 3 eggs
  • 1 tablespoon vanilla extract
In a separate bowl, mix the following or the filling:

  • 4 sliced peaches
  • 1/2 teaspoon of cinnamon
  • 1/4 teaspoon of ginger
  • 1/4 teaspoon vanilla bean
  • 1/2 teaspoon of brown sugar
  • 1/2 cup chopped pecans


1. Mix the flour, baking powder, and salt together in a bowl and set aside.
2. Cream the sugar & butter until light and fluffy
3. Add the eggs one at a time, then the vanilla extract
4. While mixing, slowly add the flour mixture and stir just until smooth dough forms.
5. Preheat the oven to 375F and pat a portion of the dough into the bottom of pie or casserolle dish. i sprayed it with butter flavored non-stick spray, but you could use pats of butter instead. The bottom layer of the dough should be about an inch thick & it should go up the side of the dish just a bit.
6. Pour the peaches on top of the dough in the dish & spread it evenly.
7. Use he remainder of the dough in spoonfull size portions & cover the peaches
8. Bake for 30 to 40 minutes, or until lightly golden and firm. Cool for 30 minutes before serving.

This came out really well & my daughter loved it so it's definitely a keeper!

Sunday, May 17, 2009

Seth's Banana Cake Muffins

When I moved away from home, my mom made a cookbook for me. It was my very fist cookbook ever, before I had ever even tried cooking or baking, before I even had my first pot or pan.

She made it by hand on a word processor and taped family pictures to each recipe. The recipes were her's that she had made over the years, and each one was put into a clear sleeve and each sleeve was put into a 3 ring binder. On the cover she put a picture of me & my brother at Christmas time when he was about 3 years old.

She made this back in the early 90's before Shutterfly and other such sites where you can create your own book. Every little bit of the book she did by hand for me, and I treasure it dearly. The only problem I have with it, is that my mom eats meat. I do not. So unfortunately, most of the main course recipes are meat related. But I have made numerous recipes from the desserts and veggies sections & they are all wonderful.

The best part is that because it's a three ring binder, I've added my own favorites to it & so has my husband. So it's something that has become an heirloom and a family project. One that I will pass on to my daughter one day as well.

I haven't tried every recipe in the book, but today, I wanted to try one of her recipes. So I tried the banana cake one since my husband loves anything banana & I figured it would be a big hit.

I made it, and as predicted, my husband loves it.

So here's the recipe unaltered:

1/4 cup butter
1/4 cup vegetable oil
1 cup sugar
2 eggs, well beaten
1 1/2 cups flour
3/4 teaspoon ground cloves
1 teaspoon cinnamon
3/4 teaspoon baking soda
1/4 teaspoon salt
3 ripe bananas

Mix the flour, baking soda & spices in a small bowl and set aside.

Mash the 3 bananas in a small bowl and set aside.

Cream butter, oil and sugar until creamy.
Add the beaten eggs
Add the dry ingredients alternating with the mashed bananas.
Mix well.

If making cupcakes, pour batter in cupcake liners and cook for about 30 mins until golden brown.
If making as a cake, bake for about 45 minutes.

It's basically banana bread, but a little more cakey.

The reason it's called "Seth's Banana Cake" is because when Seth, who is my little brother, (and I use the term "little" loosely here since he's 20 & taller than me) was 2 he stomped on a bunch of bananas on the kitchen floor. They weren't ruined, but they were too mushy to eat. So my mom decided to whip up this cake for him out of the trod upon bananas & it came out so good, she's made it ever since.

Sunday, April 19, 2009

Carrot Cake Cookies


Like my reto diner plates?

I found them at an antique store in Nashville many years ago & I love them dearly. If I could find more dishes just like it, I'd probably sell a kidney to get them if I had to. Grandmas china? Bah! Gimme good old fashioned pink & black diner plates & I'm happy.

Anyway, I'd been nosing around online for a good, yet fairly easy carrot cake cookie recipe, and I found this one at Gastonomy & it's wonderful!

I did modify it a bit since the recipe called for raisins. (see the oatmeal cookie recipe for my feelings on those nasty little buggers)

Also, I made the filling per the directions, but found it way too ... runny, yet lumpy? it was bizzare. I couldn't get it to the right consistency even with a pound of powdered sugar. And at that point it was just gross. So I skipped the filling. And that's just fine, because these cookies are so good, they can stand alone. I think the filling would be too distracting, anyway.

Carrots are eaten on a daily basis in our household. I swear my husband would be dead if it weren't for carrots. We probably all have that nice orange glow you get when you eat a lot of carrots. I don't care. So aside from the failed filling attempt, these came out fantastic!

You will need the following:

  • 1 1/8 cups flour
  • 1 tsp cinnamon
  • 1/4 tsp ginger
  • 1/4 tsp allspice
  • 1/2 tsp baking soda
  • 1/2 tsp salt
  • 1 stick of unsalted butter, softened
  • 1/3 cup plus 2 tablespoons packed light brown sugar
  • 1/3 cup plus 2 tablespoons white sugar
  • 1 large egg
  • 1/2 tsp vanilla
  • 1 cup coarsely grated carrots (2 medium)
  • 1 cup of chopped walnuts
In a small separate bowl, mix the flour, salt, spices and baking soda and set aside.

With an electric mixer, beat together the butter, both sugars, the egg and vanilla in a bowl until completely mixed. About 3 mins.

Add carrots and nuts at low speed. When that's completely mixed, add the flour mixture a little bit at a time. Keep the mixer speed on low to medium.

Drop large spoonfuls onto a parchment lined baking sheet & bake at 375 for about 15 mins or until they're just golden brown.

This recipe makes about a dozen. But because these were supposed to be sandwich cookies, I made two batches. And even though I'd planned on taking some to work, 2 dozen cookies is a little much. Especially when you consider I had already made oatmeal & honey cookies this weekend too.

So I enlisted the aid of my taste testers. The neighborhood kids. 4 out of 5 liked them and I like them, so this ones a keeper too.

Old Fashioned Oatmeal Cookies

So I got a random craving for oatmeal cookies.

But not just any oatmeal cookies. I'm very picky when it comes to oatmeal cookies.

I don't like them with raisins because raisins are an abomination, and I don't even like them with chocolate chips. I don't like them with anything but oatmeal and cookie.

Finding a recipe to fit this criteria was more difficult than I had imagined.

But, happily, I did locate one that suited my pallet at Thibeaults Table & they're perfect!

They're low on the oats, and heavy on the cookie but not so heavy that you'd miss the oats.

Perfection!

Recipes From Thibeault's Table
  • 1 cup butter
  • 1 cup sugar
  • 1/2 cup packed brown sugar
  • 1 egg
  • 2 tsp vanilla
  • 1 2/3 cup flour
  • 3/4 tsp baking soda
  • 1/8 tsp baking powder
  • 1/4 tsp salt
  • 1 tsp cinnamon
  • dash nutmeg
  • 1 1/2 cups rolled oats
Preheat oven to 350

In a small separate bowl, combine flour, soda, baking powder, salt, cinnamon and nutmeg.

In a larger bowl, cream butter and sugars together until light and fluffy.

Add egg and beat until smooth.

Add vanilla and beat on low

Stir the combined flour, soda, baking powder, salt, cinnamon and nutmeg into butter mixture.

Add rolled oats a little at a time & beat on low with each addition


Roll into medium sized balls

Bake 12-15 minutes or until bottoms are golden.

Cookies should not get brown.
Remove from oven & cool on rack

A dear friend came by just as I was taking these out of the oven & we sat on the back porch in the sunshine nibbling on these beauties. It was a very good day!

Sunday, March 29, 2009

Honey Cookies

When I was a kid, my family always got our baked goods at a local bakery outside of Nashville called Beckers Bakery. The cakes were wonderful but their cookies were the best! Especially their Honey Cookies. When we moved away, I was never able to find another bakery that had these kinds of cookies, so I pretty much gave up trying & only have them on the occasions I go back home.

Today, however, I had a mad craving for honey cookies. So I looked up recipes for them. I didn't really expect to find any good ones, but I did come across this one called Honey Bee Cookies from cooks.com. I made it today (with minor alterations) and they came out great! They almost taste just like the ones from Beckers! They are however, very sweet. Even for me & I love sweets. I don't remember the ones from the bakery being quite so sweet, but then, it's been a good 10 years since I've had theirs. So it's hard to judge. But my little one liked them too, so I'll make them again.

Now that I'm on a a cookie making roll, I will only send my home made cookies in her school lunch. I really don't want her to have all the preservatives & junk that are in store bought pre-packaged cookies. Cookies are not meant to have a year long shelf life. They are to be eaten and enjoyed immediatley. But she wants cookies, and my husband likes to have one with lunch too, so I usually end up making big batches on the weekends.

And although I don't think my husband will like these, I think they came out pretty good.

here's the recipe:

Honey Cookies

  • 1/2 cup packed brown sugar
  • 1 stick of butter, softened
  • 1/2 cup honey
  • 1 egg
  • 2 cups all-purpose flour
  • 1/2 tsp. baking soda
  • 1/2 tsp. salt
  • 1/2 tsp. ground cinnamon

1. Heat the oven to 375 degrees.

2. Beat butter, brown sugar, honey and egg in a medium bowl on medium speed, scraping bowl constantly, until smooth. Stir in remaining ingredients.

3. Drop the dough by Tablespoon fulls onto a parchment paper lined cookie sheet.

4. Bake until set and light brown around edges 8 to 12 minutes. Let stand 3 to 5 minutes before removing from cookie sheet, then remove from cookie sheet with metal spatula onto a wire rack. Makes 12 cookies.

Sunday, March 22, 2009

Spiced Chocolate Guinness Cupcakes


I was so excited when I found this recipe here at Foodess, that I absolutely HAD to make it THIS weekend. It simply couldn't wait another week. Finances be damned! We MUST have Guinness Cupcakes!

I've been eyeballing a lot of variations on chocolate Guinness baked goods, but this one seemed to be the most simple & straightforward recipe that didn't require me to purchase new kitchen equiment.

And unlike just about every other recipe I make, I didn't alter this one little bit.

Ok, well, not the cupcake part anyway. I did use my own butter cream frosting though.

So here it is:
  • 1 1/2 cups sugar
  • 1 3/4 cups flour
  • 3/4 cups cocoa
  • 1 1/2 tsp baking powder
  • 1 tsp salt
  • 1 tsp cinnamon
  • 1/2 tsp nutmeg
  • 1/4 tsp allspice
  • 2 eggs
  • 1 cup soy milk (alright, so i altered that one little thing. the original calls for regular milk)
  • 1 tsp vanilla
  • 1/2 cup butter, melted
  • 1 cup Guinness beer

1. Heat oven to 350 degrees and line two muffin tins with paper liners. Whisk together sugar, flour, cocoa, baking powder, salt, and spices.

2. In a separate bowl, blend together eggs, soy milk, melted butter*, beer, and vanilla. Add to dry ingredients and beat on medium speed of electric beaters for 2 minutes. Fill cupcake liners to three quarters full. Bake for 25 minutes, or until inserted toothpick comes out clean. Cool completely before frosting.

*be sure to use beer that is at room temperature. I would recommend leaving a bottle out overnight in fact. I had left a bottle out for about an hour before making this, but it was still cold. Which meant that when I added it to the melted butter, it immediately solidified the butter. Somehow, I don't think this was the desired effect. But it worked out anyway.

I used the same frosting from the Vanilla Rum Spice Cookie recipe.

Personally? I think these ROCK! It's a perfect blend of Guinness & chocolate without one overpowering the other. I will totally make these again. And again and again..

But, that is just me. If you're not a Guinness fan, then these probably wouldn't do it for you. I, however AM a fan & these DO work for me very well!

I'm so glad I didn't wait to make these! Yum!

Vanilla Rum Spice Cookies


These are SO good!

When I took them out of the oven last night, I gave my husband a small bite. Just to see if he'd like them.

And I swear to you, I thought his eyeballs were going to roll back in his head, and all he could say was "MORE OF THOSE!!"

Yep! That's what I was going for! Now, I gave him the un-frosted variety because he doesn't like frosting at all. But they're really good either way.

The funny thing about these, is that they're not what they're supposed to be. They're supposed to be Root Beer Cookies. I found this great little recipe here at Makes and Takes. And thought that was a brilliant idea!

Unfortunately, I couldn't get my hands on any root beer flavoring. But I did have some rum flavoring hidden in the back of my spice rack & it's been begging me to use it for over a month now. So, I thought, what the heck? I'll give it a shot.

And y'know what?

They're divine! I don't think I'm even going to try the root beer version now!

Here's what I did:

Makes about 2 dozen

  • 1 cup vegan butter
  • 2 cups light brown sugar
  • 2 eggs
  • 1 tsp imitation rum extract
  • 1 tsp vanilla extract
  • 3 1/2 cups flour
  • 1 tsp. baking soda
  • 1 tsp. salt

Cream butter and brown sugar until very light and fluffy. Add the eggs one at a time, beating well after each addition. Add the rum & vanilla extracts. Whisk dry ingredients together. Add a little at a time to the creamed mixture. The dough should be slightly sticky

Chill for at least an hour.

Preheat oven to 350 degrees F. Lightly grease several baking sheets, or line them with silicone baking mats or parchment paper. Roll into balls & place on cookie sheet. With a spoon, press down on the top of each ball, so it's flattened a little bit.

Bake for 6-8 minutes. More if you're cookie balls are a little bigger. When done transfer to a plate or paper towels to cool.

My frosting is a little free-form and I make it a little differently depending upon what it's going on. For these cookies, this is pretty much what I did:

  • 1 stick of earth balance butter
  • 1 teaspoon of vanilla
  • 1/2 cup soy milk
  • 1/2 teaspoon of nutmeg
  • a whole lot of powdered sugar

mix all ingredients together well and keep adding the powdered sugar until you get a nice stiff consistency.

Then I filled the little spoon sized depression on top of the cookies with the frosting, and volia!

I suppose you could cover the whole cookie with frosting, but in my personal opinion, the flavor of the cookies is subtle and delicate and too much of the frosting would be overpowering. Plus, they look pretty with just a dab of frosting.

Everyone in my household LOVES these, so this recipe is definitely a keeper!


Sunday, February 8, 2009

perfect biscuits


As I've mentioned before, I'm not the best baker in the world. But, I try.

Specifically, I've been trying biscuits for about a year now. With no success until today.

Last week I found an old recipe card for "Sky-High Biscuits". The card is probably from the early 70's. Way back in the day when my mom collected these things & even had a little holder for them and everything.

Some of the recipes on these cards were pretty good.

Most, however, were fairly horrific. Monstrous combos like 'Coffee Jello' and 'Tomato Frappe', 'Tongue Aspic' (i don't even want to know what that involves) 'Poached Trout' and 'Ox Tail Ragout'. Those were some of the more tame ones. I am eternally grateful to my mother for NOT making these trauma-causing creations.

But, the recipes that are keepers are the basic, old fashioned kind that you can't really screw up. Too badly, anyway.

And again, my picky hubby issue comes into play for this. He loves biscuits, but they have to be made just so or he can't eat them. The kind from fast food joints are too heavy, and the ones from the store-bought cans are too oily for him.

So today, I decided to put on a brave face & try this recipe.

And, you know what? He LOVED them! W00T!!

They're light, fluffy, and dry without being too dry. We were all very pleased with how they came out.

So here it is, the 1970 biscuit recipe from my moms collection

Prep Time: 15 min.
Baking Time: 15 mins
Oven Temp: 450

For about 20 you will need the following:

2 Cups All-Purpose Flour (King Arthur Preferably) (because it's the best)
1 Cup Whole Wheat Four
4 1/2 tsp Baking Powder
2 tsp Sugar
1/2 tsp salt
3/4 tsp cream of tartar
3/4 cup butter
1 egg, beaten
1 Cup of milk

1.) In a bowl combine the flours, baking powder, sugar, salt and cream of tartar.

2.) Cut in butter until mixture resembles coarse cornmeal. (ie: dry and crumbly)

3.)Add egg and milk, stirring quickly and briefly. Knead lightly on floured board.

4.) Roll or pat gently into 1 inch thickness. Cut into 1 - 2 inch biscuits. Place in a greased 10 inch iron skillet (not) OR (as I did) on tin foil brushed with olive oil on a cookie sheet.

5.) Bake at 450 for about 15 mins.

Both my husband & daughter loved these. We had them with scrambled eggs & meat-less veggie sausage.