Monday, January 18, 2010

Vegan Chilli


1 bag of Red Kidney Beans soaked overnight
1 onion
garlic to taste
1 cup of TVP
2 stalks of celery
1 yellow bell pepper
salt
pepper
1 tsp cumin
2 tsp chili poweder
4 cups veggie broth
1 can of diced tomatoes
1 small can of tomato paste

1. cook onion & garlic in pot on medium heat until soft
2. add celery & pepper
3. add beans & stir well
4. add veggie stock
5. add spices
6. add diced tomatoes & paste
7. still well


allow to cook for about 45 mins while stirring occasionally

8. add TVP

cook on medium until it's thick.

serve with brown rice or crackers and freshly chopped green onions on top.

enjoy

Spice Cake Sammich Cookies


Spice Cake is the one box-cake that I lovelovelove. really. srsly. LOVE.

Then, while browsing around the foodie blogosphere, I ran across recipes for Spice Cake Cookies!

OMG Good!

SWEET!!

but GOOD!

I found the one I liked best on The Crepes of Wrath

I liked it the best because it was so simple.

Ingredients:

1 Box of Spice Cake Mix (do not follow directions on box. disregard them entirely)
1 stick of softened butter
1 egg at room temperature

Mix everything up

Roll into balls & then flatten the balls a little

Place on cookie sheet and bake at 350 for about 8-10 mins (depending upon the size of your cookies)

Cool on a rack.

When they are completely cooled, spread butter cream frosting on the bottom of one cookie & stick to the bottom of another cookie.

voila!

Butter Cream Frosting :

(bear in mind that all recipes for butter cream frostings are merely guidelines. there's no exact science to it & what you put in it and how it comes out really depends upon your preference. the following is my general preference, but that's subject to change as well. )

1 stick of butter
a bunch of powered sugar (roughly 2 cups)
1 teaspoon of vanilla
1/2 teaspoon of cinnamon
1 Tbs of milk

beat with electric mixer until smooth. add sugar & milk until you achieve the consistency that suits you best.

Sunday, January 17, 2010

Sunday Cinnamon Rolls

 \

Bread has been working well for me lately & this is my latest project.

I found the recipe I liked at Epicurean Escapism and modified it just a little.

Buttermilk Cinnamon Rolls * now with flour!


Ingredients:

for the dough:

  • 2 tbsp sugar
  • 2 3/4 cup all purpose flour
  • 1 1⁄4 tsp baking powder
  • 1⁄2 tsp baking soda
  • 3⁄4 tsp. salt
  • 1 1⁄4 cup buttermilk
  • 6 tbsp melted butter

For the filling:
  • 2 1/2 tbsp. melted butter
  • 2 tbsp. sugar
  • 1 tbsp. cinnamon
  • 1/4 tsp vanilla

For the glaze: (i don't always follow this exactly. sometimes i add cinnamon to this as well. also, i make enough to cover the rolls & the extras)
  • 2 tbsp. water
  • 1 cup powdered sugar
  • 1/4 tsp vanilla

1. Preheat oven to 425°F

2. In a bowl, mix together the flour, sugar, baking powder, baking soda and salt to form the dough.

3. Stir in the butter and buttermilk.

4. Mix well. The dough will be thick and gooey, so at this point I usually knead it right in the mixing bowl to incorporate all the ingredients and little dry morsels, before placing on the floured surface of my counter.

5. With floured hands, gently knead the flour into the dough until smooth.6. With a rolling pin, roll the dough out into a square of approximately 1⁄2 inch thick.7. Spread the surface of the dough with 2 tbsp melted butter, then sprinkle on the cinnamon and sugar.

8.Go to the edge of the dough with the filling as much as possible, then trim off the edges of the dough so that you have a perfect square & the cinnamon filling is right at the edge of the dough. set the extras aside.

9. Gently roll the dough into a log shape with the filling inside. Trim off the ends if they're not even. Then slice off about 2 inches thick

10. Place the rolls in a lightly greased pan, and bake for about 20mins, or until the edges have turned golden brown.

10. Pour prepared glaze onto the rolls while they’re warm, but have cooled for just a few minutes.

After I've removed them from the oven, I roll the extra dough in a separate dish & bake and glaze those as well as I don't like to waste anything.

sorry! i totally forgot to add the flour when i originally posted this! blogger has a new interface i was fighting with & got totally distracted. 

Tuesday, January 5, 2010

Pizza!


Pizza is one of the precious few things that I can get both my husband and daughter to eat reliably.

And since we're not wealthy, we cannot afford to order out very often, so I usually get the frozen variety.

We've spent years sampling various brands of frozen pizza, and although some are better than others, none have really made all 3 of us happy.

But since I had a smashing success with the pretzels, I decided to have a go at home made pizza.

I was not disappointed.

I used a dough recipe I found at Once Upon A Plate and tweaked it a bit to suit my pallet, and for the sauce I used a portion of my Tomato Bisque recipe, but with a little extra flour added to thicken it up a bit.


Pizza Dough


Yields 1 large, 2 medium, or 4 small pizza crusts

Preheat oven to 500


Ingredients:

1 Tablespoon active Quick Rise

Pinch sugar

3/4 cup very warm (not hot) water

1 3/4 cups all-purpose flour

1/2 teaspoon salt

¼ teaspoon dried oregano

¼ teaspoon dried basil

salt and pepper to taste

½ teaspoon garlic powder


In a small bowl or glass measuring cup dissolve the yeast and sugar in warm water, stir and set aside for 10 minutes.

Mixture should begin to bubble and foam at the end of the time

While the yeast is dissolving, in a medium bowl, combine flour and salt, pepper and herbs and set aside.

Add the liquid yeast mixture to the dry ingredients and stir until well combined.

Flour a work surface and knead dough for a couple of minutes until smooth and elastic.

Using a rolling pin, roll the dough into 1 large, 2 medium, or 4 small pizzas.

After the dough is rolled out, gently lay on a pizza pan and add sauce, fresh herbs of your choice, cheese and toppings

Bake in hot oven until as crispy as desired. Usually about 10 minutes in my experience.

Serve and enjoy!


This is something that is actually very quick. Once I had the sauce made up and the toppings I want, the whole process takes about 20 minutes from dry ingredients to on my plate. It takes no more time than a frozen pizza does to cook, and it's much healthier .

So, now, my fam wants this all the time and I'm happy to oblige.

Sunday, January 3, 2010

The Best Shortbread Cookies Ever.


That's a pretty strong statement, I know.

But I feel that strongly about these shortbread cookies.

I'm not normally a fan of the stuff, more my mom's thing than mine, but these are good and easy.

I found the original recipe at TSG, and made them the first time as recommended with Nutella.

And they were good.

But then, I thought that they would also taste good with a little strawberry jam instead. So I tried them that way last night, and I actually like that way even better.


Ingredients:

  • 2 sticks of butter, softened
  • 1 cup powdered sugar
  • 1 teaspoon vanilla extract
  • 2 ½ cups all-purpose flour
  • ¼ teaspoon salt

Preparation:

In a separate bowl, sift flour and salt together. In the mixers bowl, cream the butter and sugar with an electric mixer.

Beat in the vanilla extract.

Gently add the sifted flour and salt mixture into the creamed butter and sugar, and mix on low until well blended. When the mixture is dry and crubly, add 2 teaspoons of milk to the mixture, until everything comes together.

Form the dough into a disk, then wrap it in plastic wrap, and chill it in the refrigerator for about an hour (or until the dough has firmed-up).

Preheat oven to 350ยบ. Line two baking sheets with parchment paper.

Take the dough out of your refrigerator and roll the dough out on a lightly floured surface to ¼ of an inch thick. Using the cookie cutters of your choice, cut out the cookies & place on the lined baking sheets.

Bake cookies for about 10 minutes or until the cookies have lightly browned. Cool for 5 minutes on baking sheets before proceeding to cool the cookies on a cooling rack for about 15 minutes.

After the cookies have cooled, spread Nutella or the jam of your choice on half of the cookies, and sandwich the cookies together.

Irish Creme made at home


This requires a good deal of whiskey.

Just putting that out there right off the bat.

My husband got a bottle of Jameson's from his work crew for Christmas, but he never touches the stuff any more. He pretty much sticks to Bass Ale & he's good.

However, I couldn't allow it to just *sit* there. All alone. By itself. Doing nothing. Going to waste. But I sure wasn't planning on doing shots of it any time soon either.

And that's when I ran across this recipe from Cupcake Project. Perfect!

The post's label is 'You'll Never Buy It Again', and I totally agree. This recipe is so simple and quick, that I see no reason to ever buy it from the store ever again. The most expensive ingredient is the whiskey, but this will make enough to last you a while.

I altered it a little bit from the listed recipe, but you can go to that blog to see what the difference is.

  • 1 Cup light cream
  • 14 oz Carnation brand sweetened condensed milk
  • 1 2/3 C Irish whiskey (I used Jameson's and you can use more or less to taste.)
  • 2 Tablespoons of coffee
  • 2 T Hershey's chocolate syrup
  • 1 t vanilla
  • 1 t almond extract
  1. Combine all ingredients in a blender and set on high speed for 30 seconds.
  2. Bottle in a tightly sealed container and refrigerate. Shake before using.
  3. Will keep for up to 2 months.

voila.

Couldn't be easier & it's good. STRONG. but GOOD!

Saturday, January 2, 2010

Holiday Treats

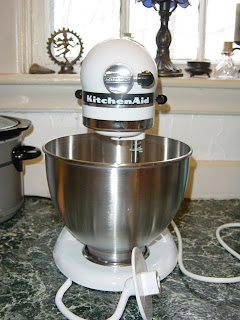
First and foremost, I would like to thank my mom & stepdad for giving me this beautiful mixer for christmas. I was so excited about it that I started to hyperventilate. My mom didn't know if that I was happy or upset, so my husband had to translate that I was in fact, very, very happy.

Needless to say, I've already used it & it's magical, wonderful and splendid. My mom took the opportunity to point out that she never thought I'd be so excited over a kitchen appliance & that she was pretty sure this meant I was a 'grown up' now. well. really? it's just a big toy for big kids.

And besides, cooking and baking is playing to me anyway.

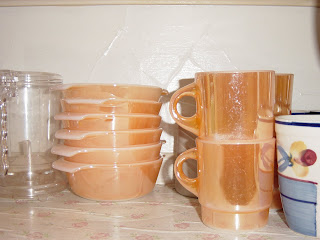
My second thank you goes out to my MIL (mother in law) for bestowing upon me a full set of Anchor Hocking Fireware Lusture mugs, custard bowls and a baking dish!

She found them in her basement. They were leftover from the last family that lived there & in perfect condition. So perfect, in fact, they're like new. They were obviously never used very much. And that will change in short order. But she didn't want them. Can you believe it?! She didn't want them!

She is aware of my secret love, no, obsession with vintage dishes ( i can correctly identify make, style and patten of depression glass at 30 paces) so she asked me if I wanted these. OF COURSE I WANTED THEM! I'm in heaven! Tonight, I'm making homemade pizza with dough and sauce from scratch. Then, for dessert, I'm going to use these beautiful little custard dishes to make individual chocolate puddings with a recipe I found at Chat and Chew.

But before I get to that, I do want to post what I made for myself for my birthday with my new mixer.

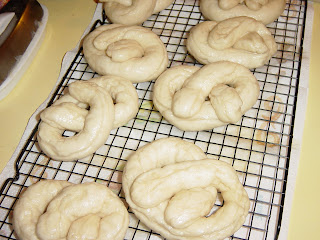
Home made soft Pretzles!

I found this recipe at Picky Cook and didn't alter a thing about it.

It's labor intensive, and eats up a chunk of my day, but goodgod, it's well worth it. My husband wolfed down four without stopping to breathe.

So here it is, try it & you won't be sorry, I promise!

Makes 16

2 cups warm water
1 tablespoon + 2 tablespoons sugar
1 packet active dry yeast
5 to 6 cups all-purpose flour, plus more for dusting
1 tablespoon salt
2 teaspoons olive oil
1/4 cup baking soda
1 large egg
sea salt

Vegetable-oil cooking spray

1. Pour warm water and 1 tablespoon sugar into the bowl of the electric mixer. Using the dough hook to combine. Sprinkle with yeast, and let sit 10 minutes; yeast should be bubbly.

2. Add 1 cup flour to yeast, and mix on low until combined. Add salt and 4 cups more flour, and mix until combined, about 30 seconds.

Beat on medium-low until dough pulls away from sides of bowl, about 1 1/2 minutes. Add another 1/2 cup flour, and knead on low 1 minute more. If dough is still wet and sticky, add 1/2 cup more flour. Knead until combined, about 30 seconds. Transfer to a lightly floured board, and knead about ten times, or until smooth.

3. Pour a small amount of oil into a large bowl; swirl to coat sides. Transfer dough to bowl, turning dough to completely cover all sides. Cover, and leave in a warm spot for 1 hour, or until dough has doubled in size

4. Heat oven to 450 degrees F. Line baking sheets with parchment paper. ( i used oil greased foil for one batch & they didn't come out very well, so I would recommend the parchment paper)

Set aside. Punch down dough to remove bubbles. Transfer to a lightly floured board. Knead once or twice, divide into 16 pieces

5. Roll one piece of dough at a time into an 18-inch-long strip on an unfloured board. Twist into pretzel shape & transfer to prepared baking sheet. Cover and continue to form the rest of the pretzels; eight will fit on each sheet. Let pretzels rest until they rise slightly, about 15 minutes.

6. Meanwhile, fill large, shallow pot with 2 inches of water. Bring to a boil. Add baking soda (and step back, it foams up quickly) and remaining 2 tablespoons sugar. Reduce to a simmer; transfer three to four pretzels to water. Poach 1 minute on each side. Use slotted spoon to transfer pretzels to baking sheet (I used a drying rack with paper towels underneath - then once they were dry I put them on the baking sheets). Continue until all pretzels are poached.

I'm honestly not sure what this step is about, but every pretzel recipe I've seen calls for this.
7. Beat egg with 1 tablespoon water. Brush pretzels with egg glaze. Sprinkle with salt. Bake until golden brown, 12 to 15 minutes. Let cool on wire rack, or eat warm.

Pretzels are best when eaten the same day, but will keep at room temperature, uncovered, for two days. Do not store in covered container or they will become soggy. Seriously. I tried to store them in a container later that night & they were immediately soggy. So, I ended up keeping them in the fridge, but the next time I make these, I will absolutely leave them out for at least 24 hours.

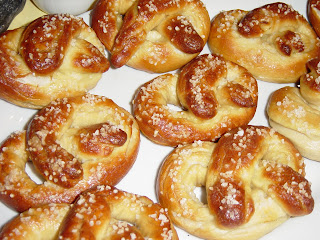
Serve & enjoy! I like them as is, but my hubs covered in spicy brown mustard.