Sunday, January 3, 2010

The Best Shortbread Cookies Ever.


That's a pretty strong statement, I know.

But I feel that strongly about these shortbread cookies.

I'm not normally a fan of the stuff, more my mom's thing than mine, but these are good and easy.

I found the original recipe at TSG, and made them the first time as recommended with Nutella.

And they were good.

But then, I thought that they would also taste good with a little strawberry jam instead. So I tried them that way last night, and I actually like that way even better.


Ingredients:

  • 2 sticks of butter, softened
  • 1 cup powdered sugar
  • 1 teaspoon vanilla extract
  • 2 ½ cups all-purpose flour
  • ¼ teaspoon salt

Preparation:

In a separate bowl, sift flour and salt together. In the mixers bowl, cream the butter and sugar with an electric mixer.

Beat in the vanilla extract.

Gently add the sifted flour and salt mixture into the creamed butter and sugar, and mix on low until well blended. When the mixture is dry and crubly, add 2 teaspoons of milk to the mixture, until everything comes together.

Form the dough into a disk, then wrap it in plastic wrap, and chill it in the refrigerator for about an hour (or until the dough has firmed-up).

Preheat oven to 350ยบ. Line two baking sheets with parchment paper.

Take the dough out of your refrigerator and roll the dough out on a lightly floured surface to ¼ of an inch thick. Using the cookie cutters of your choice, cut out the cookies & place on the lined baking sheets.

Bake cookies for about 10 minutes or until the cookies have lightly browned. Cool for 5 minutes on baking sheets before proceeding to cool the cookies on a cooling rack for about 15 minutes.

After the cookies have cooled, spread Nutella or the jam of your choice on half of the cookies, and sandwich the cookies together.

Irish Creme made at home


This requires a good deal of whiskey.

Just putting that out there right off the bat.

My husband got a bottle of Jameson's from his work crew for Christmas, but he never touches the stuff any more. He pretty much sticks to Bass Ale & he's good.

However, I couldn't allow it to just *sit* there. All alone. By itself. Doing nothing. Going to waste. But I sure wasn't planning on doing shots of it any time soon either.

And that's when I ran across this recipe from Cupcake Project. Perfect!

The post's label is 'You'll Never Buy It Again', and I totally agree. This recipe is so simple and quick, that I see no reason to ever buy it from the store ever again. The most expensive ingredient is the whiskey, but this will make enough to last you a while.

I altered it a little bit from the listed recipe, but you can go to that blog to see what the difference is.

  • 1 Cup light cream
  • 14 oz Carnation brand sweetened condensed milk
  • 1 2/3 C Irish whiskey (I used Jameson's and you can use more or less to taste.)
  • 2 Tablespoons of coffee
  • 2 T Hershey's chocolate syrup
  • 1 t vanilla
  • 1 t almond extract
  1. Combine all ingredients in a blender and set on high speed for 30 seconds.
  2. Bottle in a tightly sealed container and refrigerate. Shake before using.
  3. Will keep for up to 2 months.

voila.

Couldn't be easier & it's good. STRONG. but GOOD!

Saturday, January 2, 2010

Holiday Treats

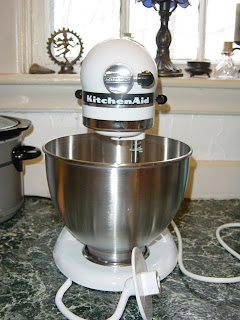
First and foremost, I would like to thank my mom & stepdad for giving me this beautiful mixer for christmas. I was so excited about it that I started to hyperventilate. My mom didn't know if that I was happy or upset, so my husband had to translate that I was in fact, very, very happy.

Needless to say, I've already used it & it's magical, wonderful and splendid. My mom took the opportunity to point out that she never thought I'd be so excited over a kitchen appliance & that she was pretty sure this meant I was a 'grown up' now. well. really? it's just a big toy for big kids.

And besides, cooking and baking is playing to me anyway.
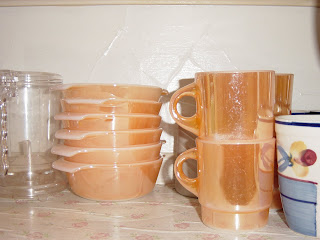
My second thank you goes out to my MIL (mother in law) for bestowing upon me a full set of Anchor Hocking Fireware Lusture mugs, custard bowls and a baking dish!

She found them in her basement. They were leftover from the last family that lived there & in perfect condition. So perfect, in fact, they're like new. They were obviously never used very much. And that will change in short order. But she didn't want them. Can you believe it?! She didn't want them!

She is aware of my secret love, no, obsession with vintage dishes ( i can correctly identify make, style and patten of depression glass at 30 paces) so she asked me if I wanted these. OF COURSE I WANTED THEM! I'm in heaven! Tonight, I'm making homemade pizza with dough and sauce from scratch. Then, for dessert, I'm going to use these beautiful little custard dishes to make individual chocolate puddings with a recipe I found at Chat and Chew.

But before I get to that, I do want to post what I made for myself for my birthday with my new mixer.

Home made soft Pretzles!

I found this recipe at Picky Cook and didn't alter a thing about it.

It's labor intensive, and eats up a chunk of my day, but goodgod, it's well worth it. My husband wolfed down four without stopping to breathe.

So here it is, try it & you won't be sorry, I promise!

Makes 16

2 cups warm water
1 tablespoon + 2 tablespoons sugar
1 packet active dry yeast
5 to 6 cups all-purpose flour, plus more for dusting
1 tablespoon salt
2 teaspoons olive oil
1/4 cup baking soda
1 large egg
sea salt

Vegetable-oil cooking spray

1. Pour warm water and 1 tablespoon sugar into the bowl of the electric mixer. Using the dough hook to combine. Sprinkle with yeast, and let sit 10 minutes; yeast should be bubbly.

2. Add 1 cup flour to yeast, and mix on low until combined. Add salt and 4 cups more flour, and mix until combined, about 30 seconds.

Beat on medium-low until dough pulls away from sides of bowl, about 1 1/2 minutes. Add another 1/2 cup flour, and knead on low 1 minute more. If dough is still wet and sticky, add 1/2 cup more flour. Knead until combined, about 30 seconds. Transfer to a lightly floured board, and knead about ten times, or until smooth.

3. Pour a small amount of oil into a large bowl; swirl to coat sides. Transfer dough to bowl, turning dough to completely cover all sides. Cover, and leave in a warm spot for 1 hour, or until dough has doubled in size

4. Heat oven to 450 degrees F. Line baking sheets with parchment paper. ( i used oil greased foil for one batch & they didn't come out very well, so I would recommend the parchment paper)

Set aside. Punch down dough to remove bubbles. Transfer to a lightly floured board. Knead once or twice, divide into 16 pieces

5. Roll one piece of dough at a time into an 18-inch-long strip on an unfloured board. Twist into pretzel shape & transfer to prepared baking sheet. Cover and continue to form the rest of the pretzels; eight will fit on each sheet. Let pretzels rest until they rise slightly, about 15 minutes.

6. Meanwhile, fill large, shallow pot with 2 inches of water. Bring to a boil. Add baking soda (and step back, it foams up quickly) and remaining 2 tablespoons sugar. Reduce to a simmer; transfer three to four pretzels to water. Poach 1 minute on each side. Use slotted spoon to transfer pretzels to baking sheet (I used a drying rack with paper towels underneath - then once they were dry I put them on the baking sheets). Continue until all pretzels are poached.

I'm honestly not sure what this step is about, but every pretzel recipe I've seen calls for this.
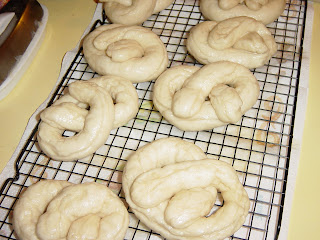
7. Beat egg with 1 tablespoon water. Brush pretzels with egg glaze. Sprinkle with salt. Bake until golden brown, 12 to 15 minutes. Let cool on wire rack, or eat warm.

Pretzels are best when eaten the same day, but will keep at room temperature, uncovered, for two days. Do not store in covered container or they will become soggy. Seriously. I tried to store them in a container later that night & they were immediately soggy. So, I ended up keeping them in the fridge, but the next time I make these, I will absolutely leave them out for at least 24 hours.
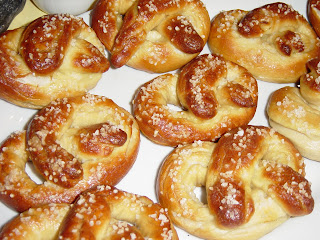
Serve & enjoy! I like them as is, but my hubs covered in spicy brown mustard.

Monday, December 28, 2009

Earl Grey Apple Sauce with Roasted Vanilla Walnuts

This is a combination of two new recipes I tried over the holidays.

I didn't intend for them to go together, but once I had them both made, combining them sounded good. And I was right. They're great together!

First, I found the applesauce recipe at FoodMayhem a few months ago, but haven't had the chance to make it. It's quick, simple and satisfying. I didn't find the Earl Grey overpowering, either. I'm a big fan of Earl Grey tea, so I would've been OK with it if it did add a strong flavor, but it turned out subtle and tasty.

4 Apples, peeled and chopped into slices
1 cup of water
1/4 cup light brown sugar
1/4 teaspoon kosher salt
1 bag of Earl Grey tea with the tag and string removed.

1. Combine apples, water, sugar and salt in a pot & bring to a boil
2. Submerge the tea bag in the water, stir so that the apples cover it
3. Reduce to a simmer & place lid on pot for about 15 mins or until most of the water has simmered off.
4. Discard tea bag.

At this point, you can mash if you'd like, but I didn't. I left the apple slices whole.


Roasted Vanilla Walnuts

I found this recipe at Elana's Pantry & it's wonderful.

Since we have 2 cars in the shop & the one functioning vehicle we have is tempremental and cranky, we weren't able to give the kind of gifts we really wanted to give this year. we're broke. so I made muffins and cookies for our families. After our daughter opened all of her presents, I was browsing on foodgawker & came across this and it was perfect! I, amazingly, had all of the ingredients in my pantry & whipped these up in 5 mins flat! I added some to each gift bag along with the baked goods & a jar of home made tomato soup.

Ingredients:

2 cups raw walnuts
1 Tablespoon Olive Oil
2 Tablespoons Agave Nectar (honey could probably be substituted for non-vegans)
1/4 teaspoon sea salt
1 -2 vanilla pods, split and scraped, or about 1/2 a teaspoon of the beans
dash of cinnamon

1. pour the olive oil in a skillet & turn on high.
2. add the walnuts & stir so that they are coated
3. when they start to sizzle, turn down the temp to med/low
4. add agave nectar & stir until nuts are coated.
5. let the nuts sizzle slightly for a couple of minutes, then stir in the salt
6. add the vanilla beans and stir until walnuts are coated
7. add dash of cinnamon & stir

transfer to a plate & allow to cool.

I'm so in love with this recipe and I keep thinking of all the ways I could eat these. Mostly, I've just been eating them by the handful, but they're great added to the apple sauce. I'm pretty sure they'd go well with sweet potatoes and oatmeal too.

Sunday, December 20, 2009

Holiday Preparation

Currently, my husband and I have 2 cars in the shop because they are dead. And the one remaining functional car we have now has a semi-working ignition because someone tried, unsuccesfully, to steal it by jamming a screw-driver in the lock. The mechanic told us that it would be $1,000 for parts and labor (since it's an import) or he could grease the crap out of it for $25 and we'd just have to 'jiggle' it a little & pray.

Obviously, we went the jiggle and pray route since it's the week of the holiday and our shopping isn't done.

This means I will be making cookies to give to our friends and families for the holiday.


Thankfully, a number of cookie recipes that I've posted recently are of the "do-ahead-and-store-in-the-fridge" variety.

Currently, I have 3 batches of chocolate cookie dough in my freezer (although one of those batches may not work. I tried to use a diabetic friendly sugar substitute and it didn't work as well as I thought it would)

And today, I've got to make 3 batches of sugar and at least 2 batches of chocolate chip.

That way all that my husband & I have to do is roll them, bake them & bag them.

In between all of this, I also have to make the chocolate chip muffins my husband is in love with.

I just hope I have enough ingredients for all of this because it's snowing here. REALLY snowing here. From the reports I've heard, most of the east coast is blanketed with a ton of snow right now.

So if you're getting snowed on, stay warm & take care and have a happy holiday!

Sunday, December 13, 2009

Cocoa Crinkle Cookies


I found this at "Behind The Skillet" and they are divine!

We hosted a dinner party last night & I made these for our guests and ohmygod they went fast!

They're simple, elegant, moist and petty.
who could ask for more?

Ingreidents:

3/4 cup flour
1/2 cup good quality unsweetened cocoa powder
1 teaspoon baking soda
1/4 teaspoon salt
1/2 cup (1stick)
1 1/4 cup sugar, plus another 1/2 cup sugar
2 eggs
2 tsp vanilla


Step 1: In a large bowl, sift together the flour, cocoa, baking soda and sal. While you're doing this, Melt the butter in a saucepan. Once the butter is totally melted, set it aside and allow it to cool for a few minutes.

Step 2: In a separate bowl, mix the 1 1/4 cup of sugar, eggs and butter. Whisk well until it has a smooth, creamy cconsistency and then add the vanilla. Whisk until well blended.

Step 3: Stir the butter mixture into the dry ingredients and stir well until combined.

Step 4: Wrap and chill in your refridgerator for at least 2 hours or overnight

Step 5: Preheat oven to 350, and line cookie sheets with parchment paper. Shape dough into small balls and roll ina bowl with 1/2 a cup of white sugar. Place balls on the parchment paper and flatten slightly with a spoon.

bake for 12 minutes.

Chocolate Chip Muffins


The Picky Hubby wanted something different for breakfast.
but he wasn't sure what kind of different.
he was just sure that he was tired of corn muffins and banana muffins.

So, I came up with this little recipe and it was a big hit.
He likes the texture & density of the muffins, they fill him up
and most importantly
they go well with his morning coffee.

The Little One loves these as well, so I usually end up making 2 batches of this so there's enough for everybody.

Ingredients:

2 cups all purpose flour
1/3 cup white sugar
1/3 cup brown sugar
2 teaspoons baking powder
1/2 teaspoon of salt
2/3 cup milk
1 stick of butter melted and cooled (1/2 cup)
2 eggs lightly beaten
1 teaspoon vanilla extract
1 cup of chocolate chips (more or less to taste)


Preheat oven to 400 and line muffin tin with muffin cups. In a large bowl mix together flour, white sugar, brown sugar, baking powder and salt.

In another bowl stir together eggs, milk, melted butter and vanilla until well blended. Make a small well in the middle of the dry ingredients and pour in the wet mixture. Stir until well combined and then add the chocolate chips

Spoon mixture into the muffin cups. Bake for 15-20 mins until ligthly brown on top. Allow to cool before eating or storing.


the original recipe calls for an entire 11 oz package of chocolate chips to be added, but personally, that's a bit much for breakfast. And my husband really loves the dough the best in this muffin. the chips are just secondary.